-
How To Articles
-
- How to Create a New Membership Template
- How to Use Memberships and Trial Memberships
- How to Use Agreements
- How to Create a New Agreement Template
- How to Use the Programs Section (Ranks Overview, Eligible to Promote, Promotions)
- How to Create or Edit Programs
- How to Use the Prospect Profile
- How to Use the Student Profile
-
-
-
- How to Create a Family
- How to Use the Student Profile
- How to Update a Student's Information on the Student Profile
- How to Inactivate or Freeze on the Student Profile
- How to Use the Student List / Member List
- How to Use Student Sign-Up
- How to Create a New Student
- How to Create and Add Awards
- Prospect and Student Statuses
- How to Use Agreements
- How to Use the Programs Section (Ranks Overview, Eligible to Promote, Promotions)
-
-
-
-
-
- How to Use the Kiosk Check-in Screen
- How to Create a Kiosk Check-in Screen Shortcut (Chrome)
- Tip: How Do I Print PINs for Student Attendance Check In?
- Tip: How to Use a Kindle Fire Tablet for the Kiosk Check In Screen
- Best Practice: How to Create an Employee Account for Attendance
- How to Use Mass Check In
- How to Print Barcode Labels for Attendance Check In
-
-
-
-
-
-
How To Videos
-
Getting Started
-
- Kicksite Training Guide
- Step 1: Get Up and Running with Kicksite
- Step 2: Customize Settings to Work for Your School
- Step 3: Basic Kicksite Tasks
- Step 4: Get Finances Set Up
- Step 5: Bring in New Students with Marketing Tools
- Step 6: Keep Students Connected
- How to Create a New Membership Template
- How to Create a New Student
- How to Use the Programs Section (Ranks Overview, Eligible to Promote, Promotions)
-
-
FAQs
-
- Best Practice: How to Create an Employee Account for Attendance
- Best Practice: How to Add Revenue Streams
- Tip: How Do I Print PINs for Student Attendance Check In?
- Tip: How to Delete a Program or Rank with Students Attached
- Tip: Use Programs to Track Employee Time
- Tip: How to Use a Kindle Fire Tablet for the Kiosk Check In Screen
You can update a student’s status from the Student List (one at a time or using Bulk Edit). You can also update the student’s status on the Student Profile page.
To update a student’s status on the student profile
1. In the Search field in the upper-right corner, start typing the student’s name, and then click the correct name in the search results. (Alternatively, click Profiles and then click Students in the left panel, and in the Student List, click the desired student’s name.) This takes you to the student’s profile.
2. Beside the student’s name and picture, click the status drop-down list and select a new status. If the student is Active, you can choose either Frozen or Inactive.
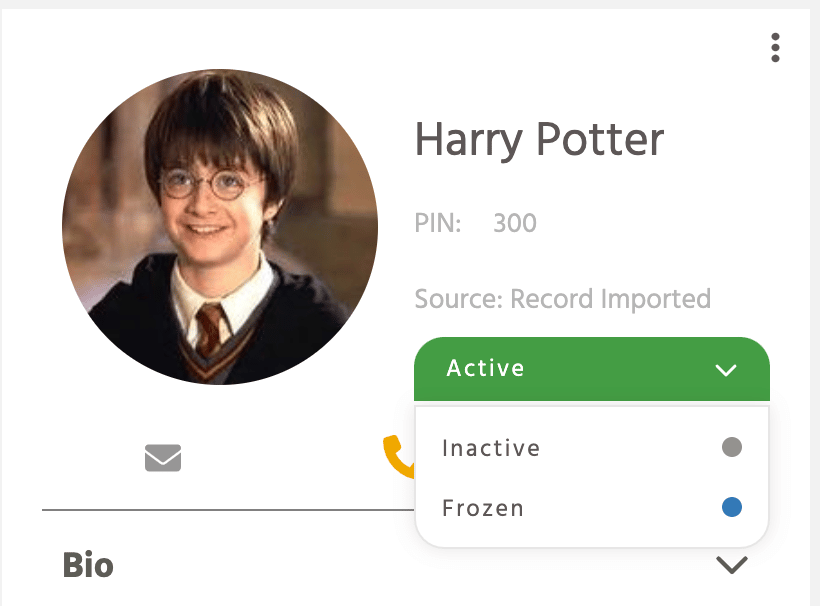
- Frozen: Choose Frozen if you need to pause a student for a short period of time, typically a month or two. A student in Frozen status will still receive general announcements or automated messages. If the student has one or more recurring billings set up, the recurring billing(s) will be made inactive when they are frozen.
- Inactive: Choose Inactive when a student quits. If the student has any recurring billings, the recurring billings will be made inactive. Inactive students will not receive general announcements or automated messages (unless you choose to send a general announcement to ALL inactive students).
3. A window pops up to let you know that freezing or inactivating the student will disable (make inactive) any recurring billings for that student. Click the Confirm button to freeze or inactivate the student.
Note: Frozen students will have access to their student user account, but inactive students will not. If you do not want a frozen student to have access to their student user account, be sure to scroll down and click Close User Account in the User Account section.