How to Add a Recurring Billing
A recurring billing will automatically create invoices and, if you enable auto pay, will automatically charge the student on a recurring basis. For example, you can set one up to automatically charge a student once per month for their membership payment.
How to add a recurring billing
You can add a recurring billing from the student’s profile page or from the Finances page.
1. From the student profile: Go to the student’s profile and scroll down to the Finance module. From the Finances page: Click Finances in the left panel.
2. From the student profile: Click Add New+ and select Recurring Billing. From the Finances page: Make sure you’re on the Recurring Billing tab and then click the Add New button. Start typing the student’s name in the Student/Family field, and select the correct student or family from the search results.
If the student or family already has one or more recurring billings set up, that information will appear after you select the student or family.
The rest of the steps are the same, whether you started from the student’s profile or from the Finances page.
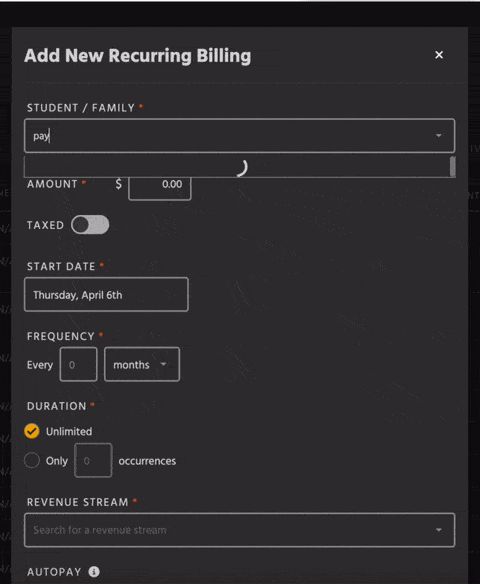
3. In the Amount field, type the amount to be billed.
4. (Optional) If the recurring billing should be taxed, click the Taxed toggle to add tax. The percentage for the tax will update based on the tax rate set in the Finances Settings. If needed, you can enter a different percentage.
5. Click the date under Start Date and select the correct date from the calendar picker. Note: Recurring billings can’t start on the 29th, 30th, or 31st of the month.
6. Under Frequency, enter the terms of the new recurring billing. In Every, enter a number for how often the billing should occur. From the drop-down list, select the time frame (Days, Weeks, Months, or Years); Months is the default. (Most commonly, you will enter 1 Months to bill once per month.)
7. Under Duration, select how long the recurring billing should bill. For an ongoing recurring billing, leave the Unlimited check box selected; for a specific number of payments, select the Only check box and enter the number of payments in the Occurrences field. See the following examples:
- To bill every month on an ongoing basis, enter: Every 1 Months and leave Unlimited selected.
- To bill every month for a year, enter: Every 1 Months, select Only, and enter 12 Occurrences.
- To bill every week for 20 payments, enter: Every 1 Weeks, select Only, and enter 20 Occurrences.
8. Select an option from the Revenue Stream drop-down list. (The most common Revenue Stream for a new recurring billing would be Membership.)
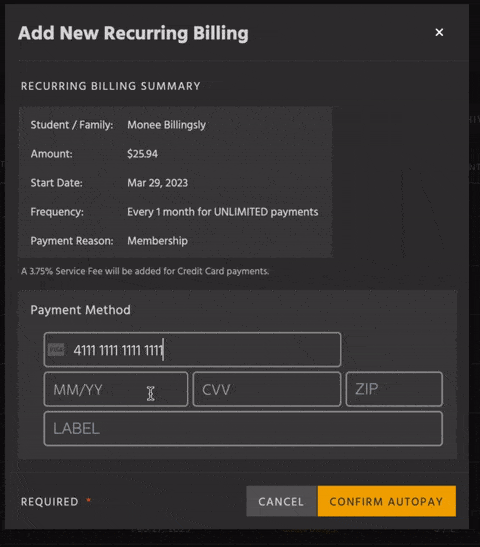
9. If you have billing with Kicksite, the Autopay toggle will be selected by default. If you do not want the client’s card to be automatically billed (or if you don’t have the client’s card saved yet), click the Autopay toggle to turn it off. If the Autopay toggle is on, click the Continue button to set up automatic payments; if the Autopay toggle is off, click the Add button to create a recurring billing that will not charge the student automatically.
10. If you clicked Continue, you can select a Payment Method or add a new one. (If the student doesn’t yet have a Payment Method added or you clicked Add New Card, fill in the card information, as shown to the left.) Click the Confirm Autopay button to save the recurring billing and start automatic payments.
You see the green notification box indicating that autopay is enabled for the recurring billing. The student will now be charged based on the Start Date and Frequency options you set up.