Kicksite Knowledge Base
How to View and Export Finances Reports
The new Finances uplift provides you with reports to better help you review and manage your finances. Read on to find out how to find, filter, and export finances reports.
How to review and export reports
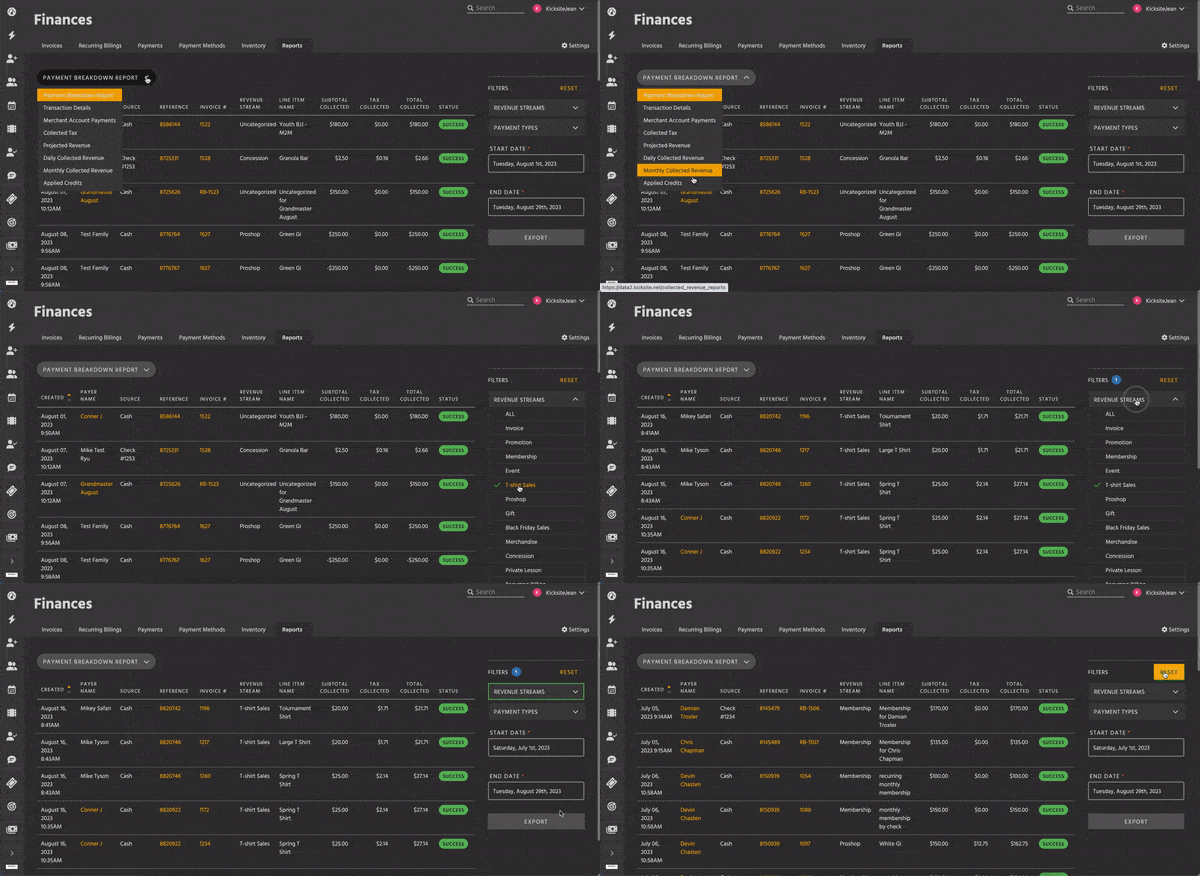
Reports are now collected on the Reports tab, making them easy to find and use. Click the Finances icon on the left panel, and then click the Reports tab.

From the drop-down list just under the tabs (near the top left), you can select from the following reports:
- Payment Breakdown Report: This report shows details about all payments collected between the Start Date and End Date. You can select a new Start Date and/or End Date as needed. You can click the Revenue Streams or Payment Types filters and select just the options you want to see (the report updates as you select options). Click the Export button to download a csv file. (You can use a spreadsheet program such as Excel to further sort and filter the exported payment details.)
- Transaction Details: This report shows payments between a start and end date. The report shows the status (Approved, Failed, Refunded, or Voided for credit card payments; Settled, Pending, Failed, or Refunded for ACH payments). You can select the Start Date and End Date from the date pickers; you can also select the payment type(s) and status(es) by clicking the filter and selecting the desired options. Click the Export button to download the report as a .csv file.
- Merchant Account Payments: This report shows the total amount of payments per day that you have processed. You can see how much of different payment types has been processed; you can also see how much has been paid in service fees. You can select the Start Date and End Date from the date pickers. Click the Export button to download the report as a .csv file. The data for this report refreshes overnight.
- Collected Tax: This report show how much tax you collected on each day. You can select the Start Date and End Date from the date pickers. Click the Export button to download the report as a .csv file.
- Projected Revenue: This report shows how much revenue you likely will make based on how much revenue was collected in the past. Click the Export button to download the report as a .csv file. The data for this report refreshes overnight.
- Daily Collected Revenue: This report shows the total amount collected by Revenue Stream and by time frame (Daily Amount, Monthly Amount, Yearly Amount, and Total Amount). You can select the Start Date and End Date from the date pickers. Click the Revenue Streams filter to select specific revenue stream options. Click the Export button to download the report as a .csv file. The data for this report refreshes overnight.
- Monthly Collected Revenue: This report shows how much money you have collected per month by Revenue Stream. For example, you can see how much you’ve collected per month for the Membership reason. (Hint: This is why it’s important to add Revenue Streams in Finance settings and to select a Revenue Stream for each invoice and recurring billing.) Click the Export button to download the report as a .csv file.
- Applied Credits: This report shows how much money you have credited on invoices. You can select the Start Date and End Date from the date pickers. Click the Export button to download the report as a .csv file.
- Provider Transactions: This report show the transactions from the merchant provider to help you reconcile payments. Depending on which merchant provider you have, the report screen may look different because the information is provided directly from the merchant provider. You can select the Start Date and End Date from the date pickers. Click the Filter button to run the report; click the Export button to download the report as a .csv file.