Kicksite Knowledge Base
How to Use Adjust Balance
Sometimes, invoices need to have their amounts adjusted. There are two main reasons to use the Adjust Balance function: you want to reduce the balance, or you don’t intend to collect the balance owed.
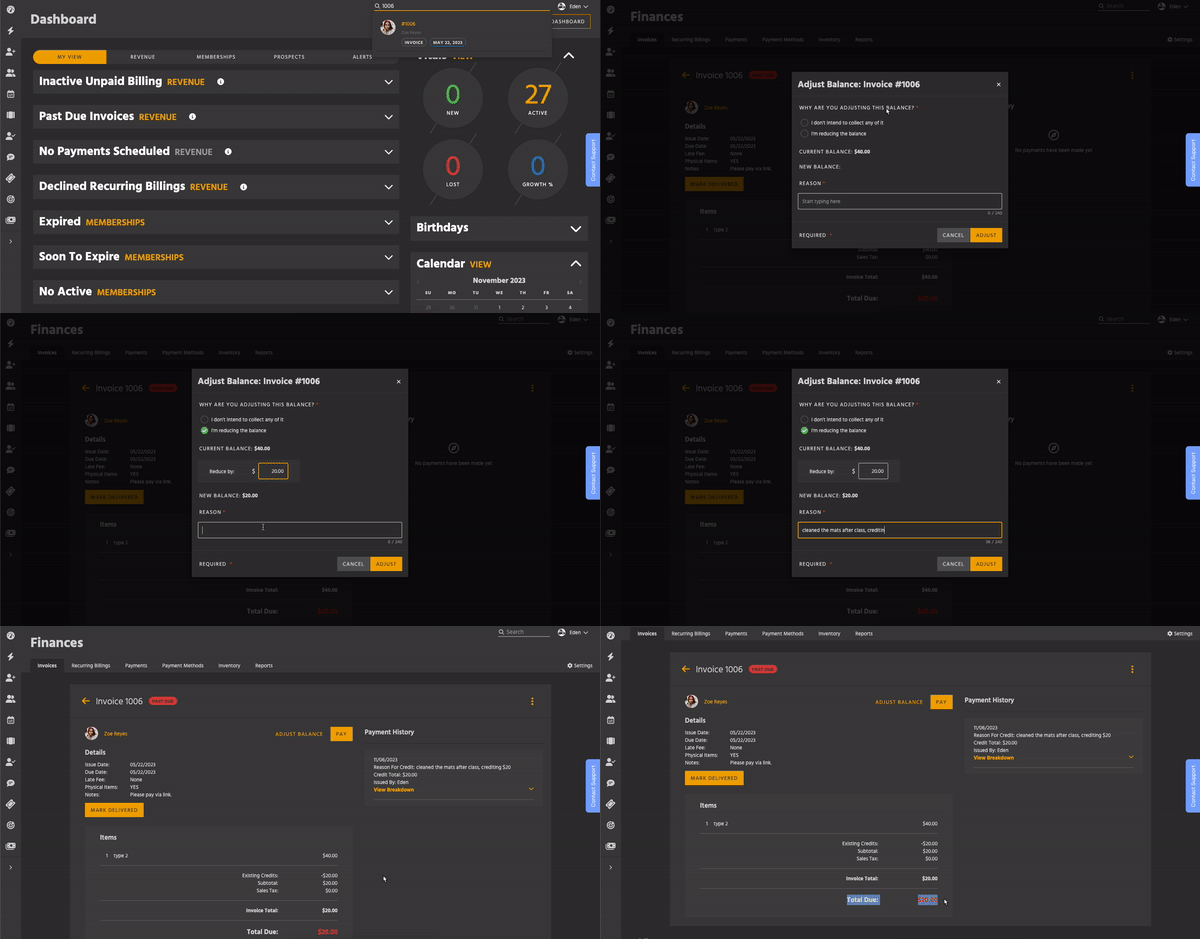
Choose I’m reducing the balance if you’re issuing a credit. For example, a student helped by cleaning the mats after class and you’re crediting their membership fees accordingly.
Choose I don’t intend to collect any of it if circumstances have changed since the invoice was made, and you don’t anticipate getting any of the money. For example, a student quit and you know they won’t be paying for their membership anymore.
To reduce a balance:

- Go to the details page for the invoice you want to adjust. There are several ways to do this;
- Search for an invoice ID in the global search
- Find it in the Finances module on a person or family’s profile
- Locate it in the Invoices section of Finances.
- Next, click the Adjust Balance button, next to the Pay button.
- In the modal that opens, choose I’m reducing the balance.
- Note that once you reduce an invoice’s balance, it’s no longer able to be voided.
- Enter the amount you want to reduce from the total. The new balance will be listed at the bottom.
- If you enter an amount greater than the Current Balance, it’ll be automatically adjusted to prevent errors.
- In the Reason field, explain why you’re adjusting the balance. This will be available on the Adjusted Balances report.
- Finally, click the Adjust button.
To mark as Don’t Intend to Collect:

- Go to the details page for the invoice you want to adjust. There are several ways to do this;
- Search for an invoice ID in the global search
- Find it in the Finances module on a person or family’s profile
- Locate it in the Invoices section of Finances.
- Next, click the Adjust Balance button, next to the Pay button.
- In the modal that opens, choose I don’t intend to collect any of it. This sets the New Balance to zero.
- In the Reason field, explain why you don’t intend to collect any of the invoice. This will be available on the Adjusted Balances report.
- Finally, click the Adjust button.