How to Add, Edit and Archive Payment Methods
One of the first tasks you will do to collect payments is to add a card number and save it to a student. Formerly, the saved card was called a Vault Item; in the new finances, this is more accurately called a Payment Method.
Note: If you do not process payments with Kicksite, you will not be able to enter or save credit card or ACH information.
Important: If you want to use a card for all members in a family, you need to add the Payment Method to the family. A Payment Method added to an individual student can ONLY be used for that individual.
How to send invitations to multiple students to add a Payment Method
If you have multiple students who need to add a Payment Method, you can send invitations in bulk to all of them. For example, it’s easier to send bulk invitations if you recently had your billing go live, or if you had several students join your school.
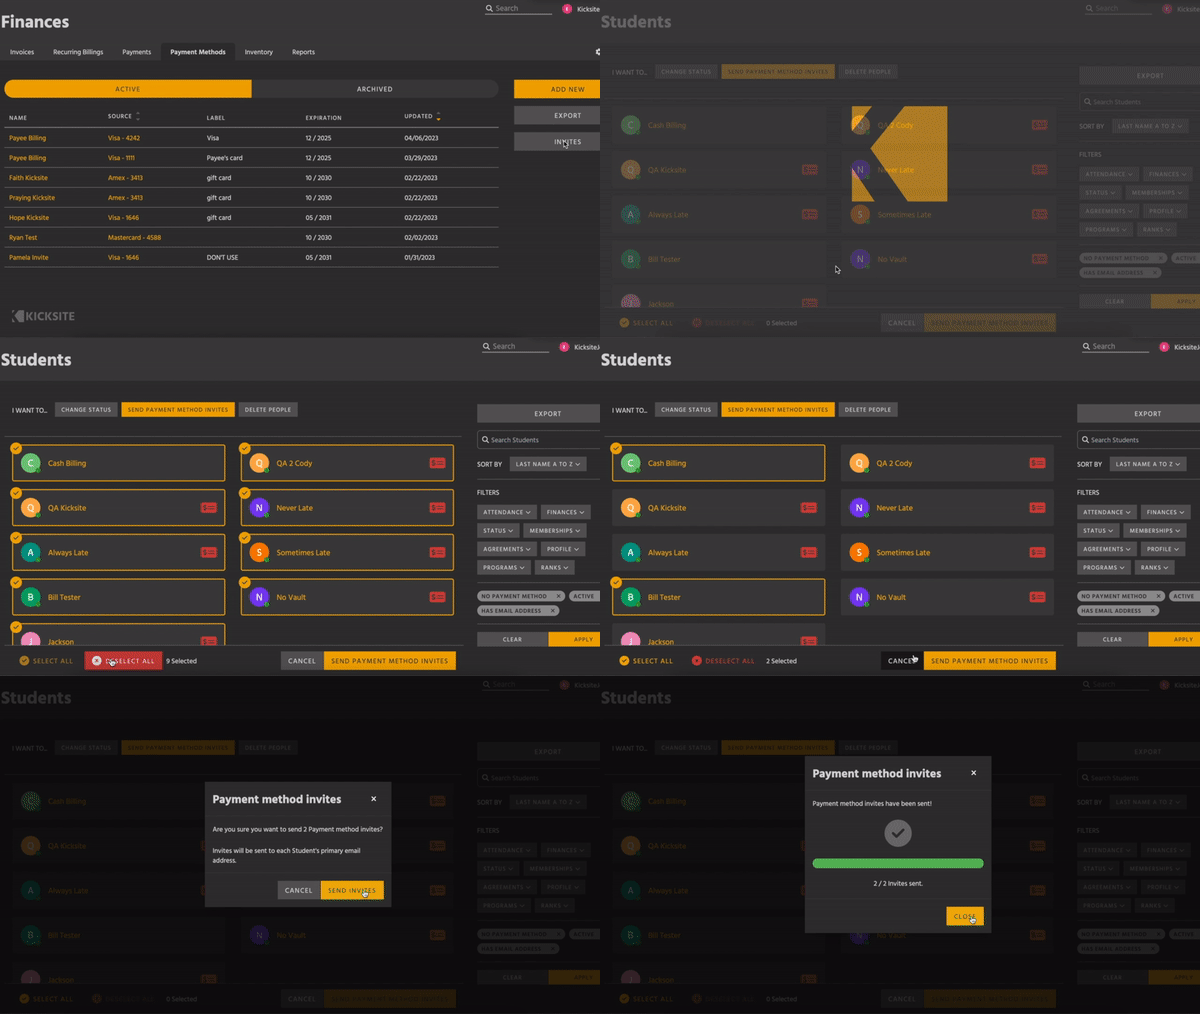
1. Click the Finances icon in the left panel, click the Payment Methods tab, and then click the Invites button on the right.

2. A list appears, automatically filtered to show active students who do not have a Payment Method and who have an email address. (The invitation to add a Payment Method can only be sent by email.) Select the students you want to send the invitation to:
- To select all students, click Select All at the bottom of the screen.
- To deselect all students, click Deselect All (this button is only available if at least one student is selected).
- To select specific students, click the boxes with their names.
3. When the students you want to invite are selected, click Send Payment Method Invites.
4. Click the Send Invites button.
5. You see a progress bar; click Close after you see the check mark that shows the invitations have been sent.
How to send an invitation to one student to add a Payment Method

You can send an invitation to an individual student to add their card information. The student (or parent) will receive an email that contains a link they can click to add their card information.
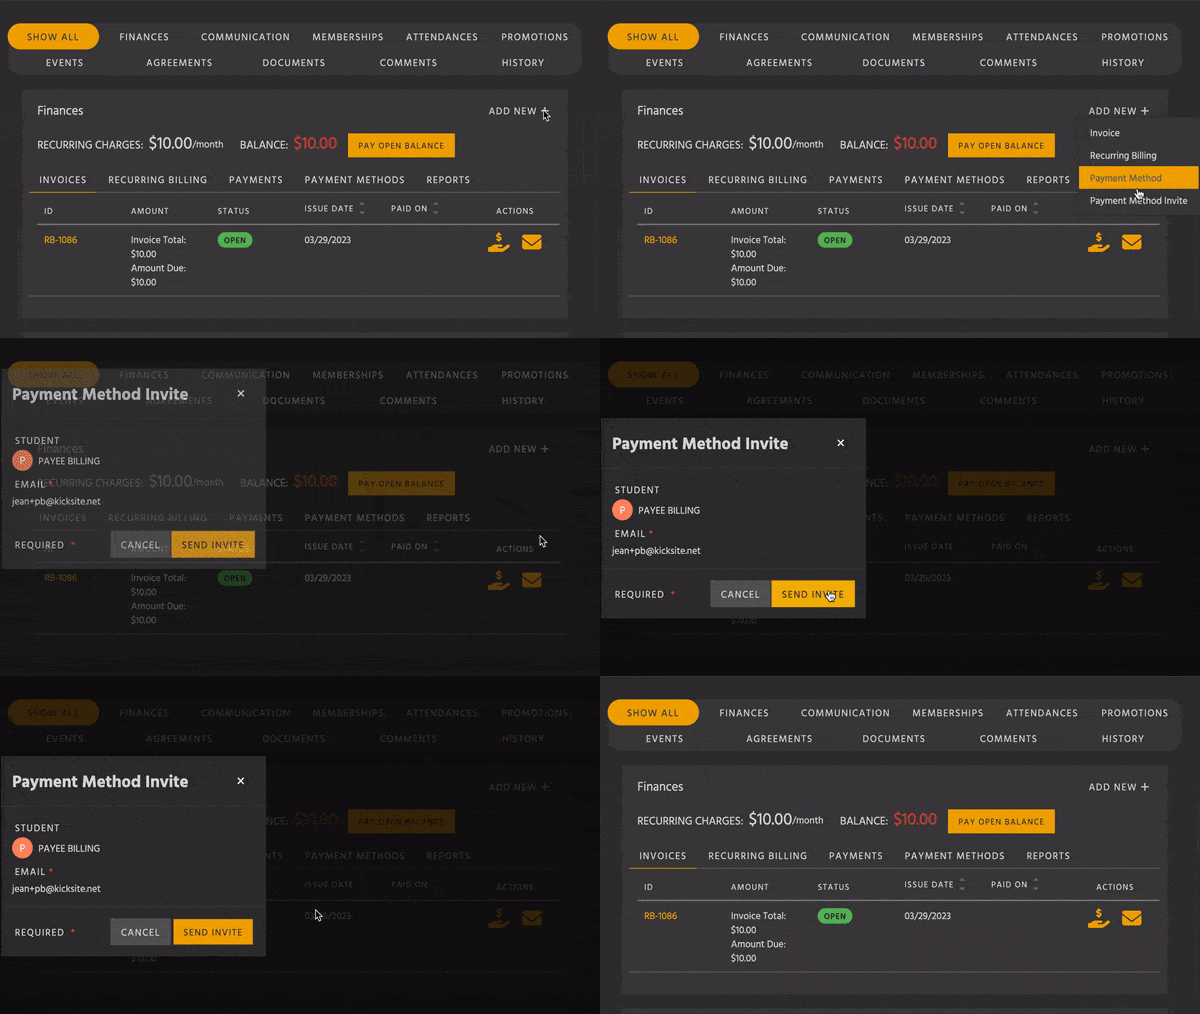
1. Go to the student’s or prospect’s profile.
2. On the Finances module, click Add New+ and then click Payment Method Invite. If the student or prospect has more than one email address, you can select which email address to use.
3. Click the Send Invite button.
You can see the Pending Invite on the student’s profile in the Finances module on the Payment Methods tab.
How to manually add a Payment Method
Tip: When you type in card or ACH information, be careful to type in all information exactly (to avoid failed payments). Also, best practice only store ACH/Credit Card information in encrypted fields to for PCI Compliance.
You can add a Payment Method from the student’s profile page or from the Finances page:
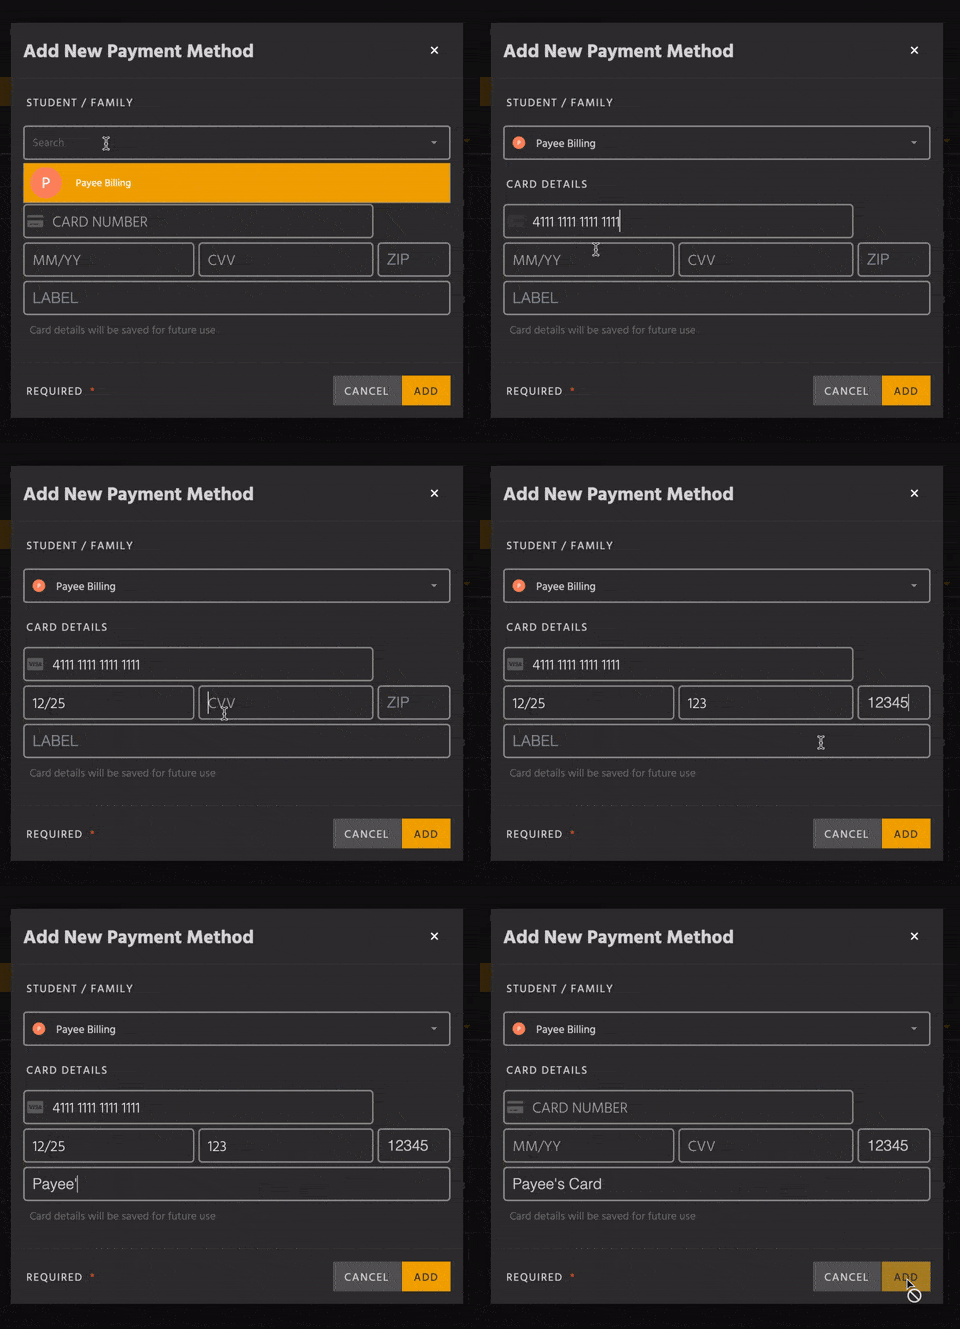
1. From the student’s profile: On the Finance module, click Add New+ and select Payment Method. From the Finances page: Click Finances in the left panel, click the Payment Methods tab, and then click the Add New button. Start typing the student’s name in the Student/Family field, and select the correct student or family from the search results.
The rest of the steps are the same, whether you started from the student’s profile or from the Finances page.

2. In the Card Number field, type in the card number.
3. In the MM/YY field, type the card’s expiration date. Be sure to use a leading zero if the month is a single digit (for example, type 01 for January).
4, Type the CVV number (found on the back of the card) in the CVV field.
5. Type the billing Zip code in the ZIP field.
6. (Optional) Type a brief description in the Label field. For example, if a student has more than one card to store, you can use the Label field to note which card should be used to pay for memberships and which card is for other purchases.
7. Click the Add button.
If your school also processes ACH, the steps to add an ACH (checking account) Payment Method are similar:
1. From the student’s profile: On the Finance module, click Add New+ and select Payment Method. From the Finances page: Click Finances in the left panel, click the Payment Methods tab, and then click the Add New button. Start typing the student’s name in the Student/Family field, and select the correct student or family from the search results.
2. Click ACH (not shown in the video above).
3. Select the type of account (Checking or Savings).
4. Select the account holder (Personal or Business). (Most often, this will be Personal for the student’s personal account.)
5. Under Account Details, enter the following:
- First Name and Last Name (The name on the account.)
- Routing # (This is the 9-digit number that identifies the bank. You can find it as the first set of numbers on the bottom of a check.)
- Account # (This is the savings or checking account number. You can find it as the second set of numbers on the bottom of a check.)
- Zip/Postal Code (This is the ZIP or Postal Code of the account holder.)
- Label (Optionally, you can enter a brief description for the Payment Method.)
6. Click the Add button.
Another way that you can collect Payment Methods is to remind students that they can log into their Member Portal and enter their own card / ACH information.
Keep in mind that once a Payment Method is created, you can only edit the label or archive it. (This is to ensure that the Payment Method is valid.) If you need to update a card, for example to change the expiration date, you will need to add a new Payment Method (and archive the expired Payment Method).
How to edit or archive a payment method
A student can add a new Payment Method from their member portal. However, the student can’t archive it. This is to ensure that if they have a recurring billing, the recurring billing always has a Payment Method attached.
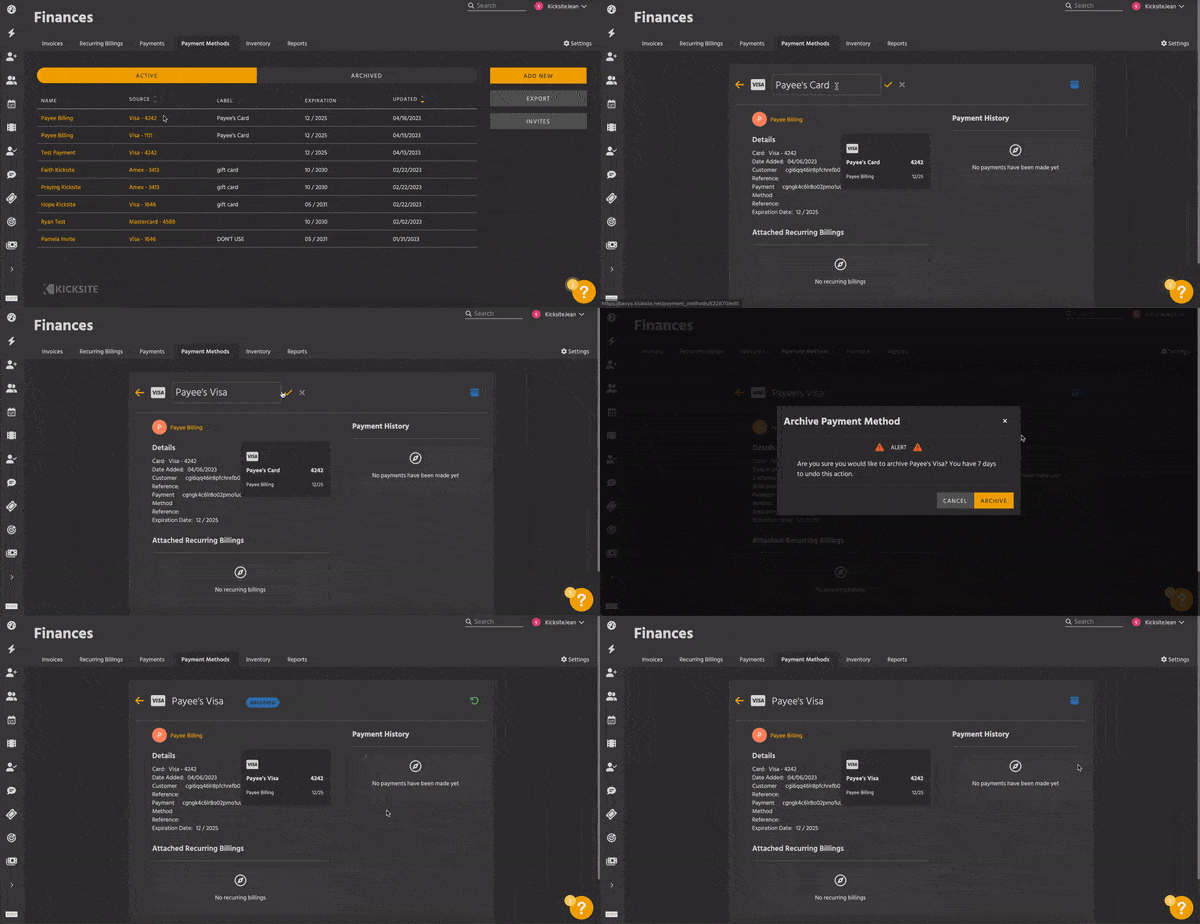
1. Find the Payment Method that you need to change or remove; you can find it in two places:
- Click the Finances icon in the left panel, and then click the Payment Methods tab. You can sort by the Source, Expiration, or Updated column to more easily find the payment method that needs changed.
- Go to the student’s or prospect’s profile by typing their name in the Search field, and click the correct result. In the Finances module, click the Payment Methods tab.

2. On the Payment Methods tab, click the link in the Source column. The link will have the type of card and the last 4 digits; for example, Visa – 4242. On the student or prospect profile, click the icon for the desired card. The last 4 digits and any label you added will appear on the card icon.
3. The card details appear. You can see payments made for that card on the right side, below Payments History. You can see any attached recurring billings on the left side, below the details.
4. Click the label and type to edit the card’s label. Click the check mark or press Return/Enter to save.
5. If you want to remove the Payment Method, click Archive; click the Archive button on the dialog box that appears. You can undo the archive action within 7 days; after that, you will need to add the card information as a new Payment Method.