How to Use the Student Profile
The Student profile page lets you view all a Student’s information, and take many different actions to manage them.
Getting to Profiles
There are multiple ways to get to a Student profile.
- Universal Search – In the upper right corner of the Kicksite header, click on the search bar, then type their name, phone number, or primary email.
- You can also search for their guardian’s name, if they have one.
- Student List – In the sidebar, click the Profiles icon (three grouped people), then click Students.
- Find them in the list via filters, or search for their name on the right side.
- Name – In many parts of the system, Students’ names are links to their profiles.
- Yellow text indicates a link.
Student Profile Left Side
Click the chevron (downward facing arrow) to expand or collapse modules.
Clicking on information allows you to edit it. Make sure to click the check to save changes. To discard changes, click the gray X.
Basic Info
Profile Picture – Click on the picture (or first initial, if no image is selected) to choose an avatar. Then, select an image from your computer / phone, or drag and drop an image.
- To zoom in or out, use the slider or a mouse’s scroll wheel. Click and drag the image to reposition.
PIN – When a Student is created, they’re randomly assigned a PIN.
- PINs are 4 digits by default. You can customize this to any number between 4 and 8 in Attendance Settings.
Source – To track how people decided to join your school, use the Source drop down.
- Sources can be added and edited in Settings > Sources.
Status – Students have several statuses: Active, Inactive, and Frozen.
- Active students are currently participating in your school, and should have active Memberships and billings (either paid-in-full invoices or active Recurring Billings).
- Frozen students are a subset of Active. They still have memberships, but any Recurring Billings are inactivated. It’s best to use this status for people that are currently gone, but will come back – such as those on trips, or who got injured.
- Inactive students aren’t attending class and don’t have active memberships. They don’t count towards your Kicksite subscription.
Kebab menu
The kebab menu (three stacked dots) holds additional actions. It’s in the upper right of the left side, next to the Student’s name.
Edit – If you need to update many things at once, such as when you’re first setting a Student up, you can open Editing Mode. Make sure to Save when done.
Delete – Permanently remove the Student from the system. Exercise caution – this can’t be undone.
There are three printable options for Check-In. Choose between a barcode card, barcode key tag, or QR code. Learn more about scanning for check in here.
Bio
If a Student signed up via Landing Page, or was created from a Lead Capture Form, some of this information may already be filled out.
Sex – Choose between Prefer not to say, female, or male.
Birthday – Select from the mini calendar. The year can be typed in after clicking on it.
Address – Type an address and select the correct option from the Google Maps dropdown.
Email – Notification settings and additional emails can be set up in the Communications module.
Phone and SMS Opt-in – If SMS is toggled on, that phone number can be included in Communications.
- If a phone number has replied STOP to opt out, that will be indicated.
- The same phone number can be on multiple profiles.
Belt Size – Select between 000 and 10.
Programs & Ranks
A list of all the Programs the Student is currently in, as well as their current belt / Rank in each Program.
Click Add New to place them in another Program. If you want to connect a Program to a Membership and Billing, however, go to the Memberships module and click Sign Up.
Contacts
Enter guardian information here. The type of relationship, such as parent, grandparent, or guardian, can be indicated. Emergency contacts are usually different people from the guardians.
Pinned Comments
(Formerly Additional Information and Critical Notes)
Pinned Comments make sure relevant information is always at hand. When adding a comment to a Student profile, click the thumbtack icon to pin it to the left side.
- You can pin multiple comments, and unpin if they’re no longer relevant or out of date.
- All comments, whether or not they’re pinned, can be seen in the Comments module.
Appointments & Tasks
View, edit, and add Appointment and Task calendar events to a Student. Upcoming includes the next 30 days. Already Past shows the last 30 days.
User Account
If a Student has an email address, you can create a user account for them. This lets them log into the Member Portal, where they can sign up for classes, pay invoices, see agreements and documents, and more.
The Restrictions section lets you choose what parts of the Member Portal this person can access.
For those who already have a user account, you can send a password reset email, or close their account.
Learn more about the Member Portal here.
Student Profile Modules
Click on a module in the tab bar to focus on only that one.
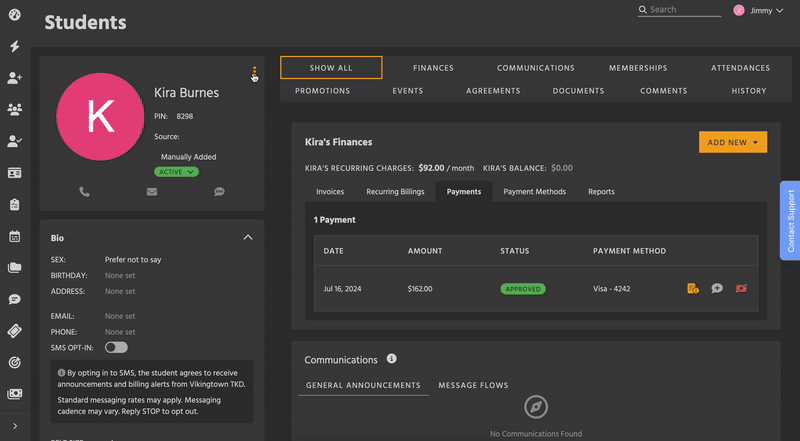
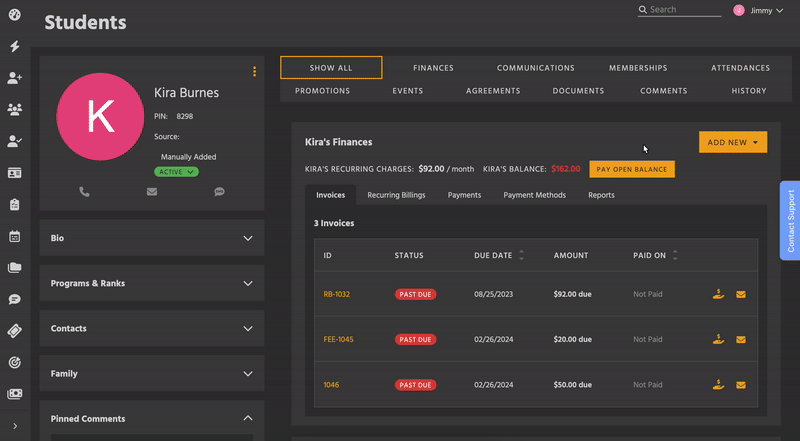
Finances
If a Student has recurring charges, they will be listed at the top of the Finances module. You can also see if they have a balance, with the option to pay it all at once.
The Add New button lets you create a new Invoice or One-Time Charge, and add a Payment Method. Students can enter their own card information via Payment Method Invite. They must have a valid email address to be sent an invite.
Use the tabs to view Invoices, Recurring Billings, Payments, Payment Methods, and Reports. All this information is also visible in the Finances section.
Communications
View a history of the General Announcements and Message Flows sent to a Student.
If they have an email address, you can configure its communication preferences, and add additional email addresses.
Memberships
View a Student’s current and past Memberships. Each one can be edited, as well as Inactivated or Reactivated.
Click the Sign Up button to add them to a new Membership, as well as set up their Program and create a billing. Learn more about Student Sign-Up here.
Attendances
View a record of the Student’s attendances, and see any Attendance Awards they’ve earned.
Use the Add New button to record an attendance, such as if the Student forgot to check in for class.
Promotions
In the Active tab, each Program is listed in a card, along with the belt graphic. The promotion date and testing score are listed, as well as the number of attendances at that rank.
Two dials display the number of classes attended and the number of days passed at that rank. If a rank has promotion requirements set, the dials will fill up as the Student progresses towards them. Otherwise, they will stay empty, but still show the numbers.
The Inactive tab shows the student’s past ranks – for Programs they’re no longer in, or for lower ranks that they’ve surpassed. Click Activate to return the Student to that rank, or the red trash can to delete the promotion.
Events
View a list of the Events the Student is included in. Click an Event’s title to view its details.
Agreements
View the Agreements attached to the Student. Depending on the status of the Agreement, you can Send it to be signed, open it in a new tab to Sign Now, or Send a signed copy.
Use the Add New button to create an Agreement for them.
Documents
View the documents (images and text documents) attached to the Student profile. These can be viewed from the Member Portal if the Student has a User Account. The table can be sorted by title or by date uploaded.
Click the yellow document icon to download a file for viewing. Click the red trash can to delete it.
Use the Add New button to upload new files. You can add multiple documents at once, but each one has a maximum file size of 30 MB.
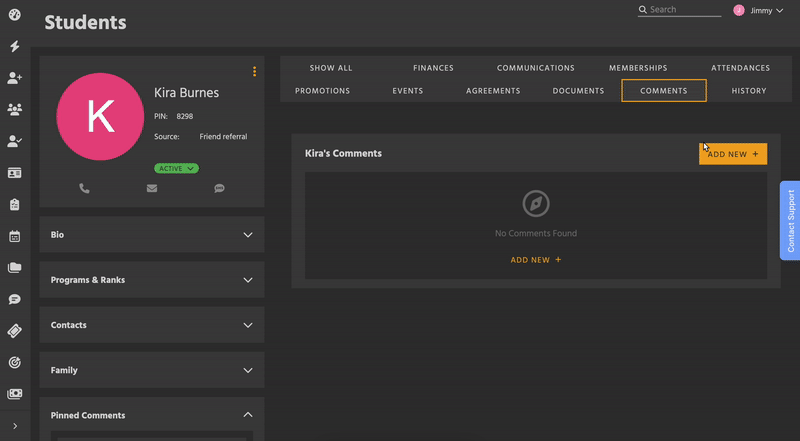
Comments
A list of all comments made on the Student. Can be filtered by commenters – such as to see only certain employees’ messages – and sorted by date.
Click the yellow thumbtack to pin a comment. Pinned comments are indicated with a solid green thumbtack and are shown in the left side module. Click the red trash can to delete a comment.
Use the Add New button to make a comment.
History
A list of changes and updates made to the Student, along with who performed the change. Shown from most recent to oldest.