How to Use the Student List / Member List
The Student List (or Member List, for some Kicksite users) is a central hub where you can perform daily tasks and bulk actions. Select the action you need, then use the filters to pare down to the people you want.
Actions
At the top of the Student List are action buttons. These let you perform a bulk action on the people you select.
- To remove the action you’ve selected, click Cancel at the bottom of the screen, or select a different action.
- On smaller screen sizes, some actions may be collapsed. Click Show More to view all action buttons at once.
Send Payment Method Invites
(Only for schools with a Merchant Provider)
This is the fastest way to get payment methods (credit cards or ACH) into your system.
- Select the Send Payment Method Invites action. This applies two filters:
- Has Email Address – You can only send an invite if there’s an email for it to go to.
- No Payment Method – You can remove this if you’d like people to have multiple Payment Methods on file.
- (Optional) Apply any additional filters.
- Select the people you want to send invites to by clicking on the cards behind their names, or use Select All.
- Selected cards have an outline and checkmark.
- Clicking a card a second time will de-select it. There’s also a Deselect All button for convenience.
- Click Send Payment Method Invites.
- On the confirmation screen, click Send Invites to proceed.
- The final screen shows the emails’ progress. Anyone that couldn’t be sent an email will be listed, with the reason why.
- You can exit this progress screen at any time without canceling the action.
Add Agreements
After setting up an Agreement Template, you can add it to many profiles at once from the Student List. In addition to putting that Agreement on each person’s profile, you can also send it to be signed, by email or SMS.
- Select the Add Agreements action. This applies one filter, to only Active Students.
- (Optional) Apply any additional filters.
- Select the people you want by clicking on the cards behind their names, or use Select All.
- Selected cards have an outline and checkmark.
- Clicking a card a second time will de-select it. There’s also a Deselect All button for convenience.
- Click Add Agreements.
- Select the Agreement Template you want to use.
- Select if you want to send via email, SMS, or not send.
- Regardless of if an Agreement is sent now, it can always be viewed (and signed) from the person’s profile, and the Agreements List.
- Only schools with an SMS integration set up can send via SMS.
- Click Add +. If you chose to send, the final screen will show the progress of that action.
- Anyone who could not be given an Agreement – such as an inactive Student – will be listed at the top.
- Anyone who could not be sent the Agreement – such as if they had no email address, or opted out of SMS – will be listed, with their reason for failure.
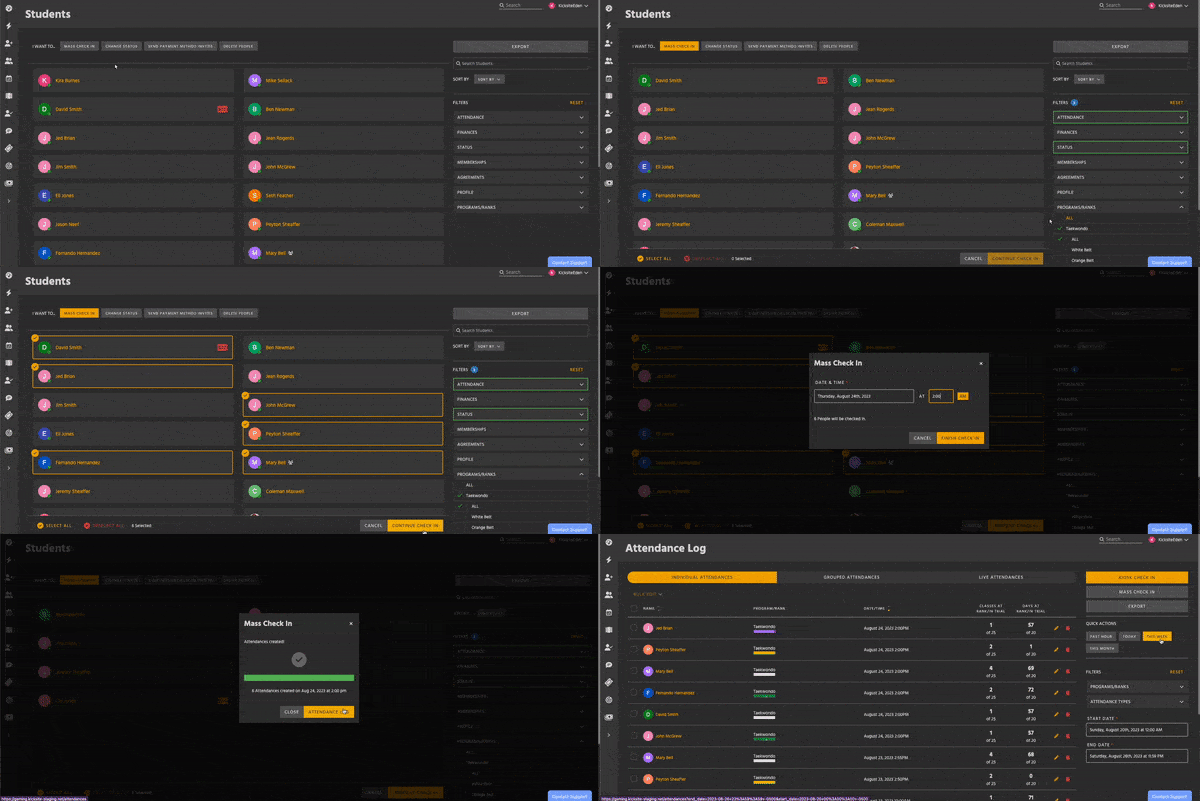
Mass Check In

Check in a group of students instead of using the Kiosk Check In screen. You can choose any date or time. For example, you can retroactively add attendances for a morning class at the end of the day.
- Select the Mass Check In action. This applies two filters:
- Active status – Only active students can check in.
- Not Checked In Today – Students who have already attended today are removed by default, to make your selection easier. Remove this filter if your students attend more than one class a day.
- Select at least one Program from the filters on the right side of the screen.
- When selecting a program, all of its ranks are also selected. Click on individual ranks to select them instead.
- Select the people you want to check in by clicking on the cards behind their names, or use Select All.
- Selected cards have an outline and checkmark.
- Clicking a card a second time will de-select it. There’s also a Deselect All button for convenience.
- Click Continue Check In.
- On the confirmation screen, choose a date and time. If any students have more than one program, choose from the drop-down menu.
- Click Finish Check In. The final screen shows the check in’s progress.
- You can close this screen at any time without canceling the action.
- You can also navigate to the Attendance Log.
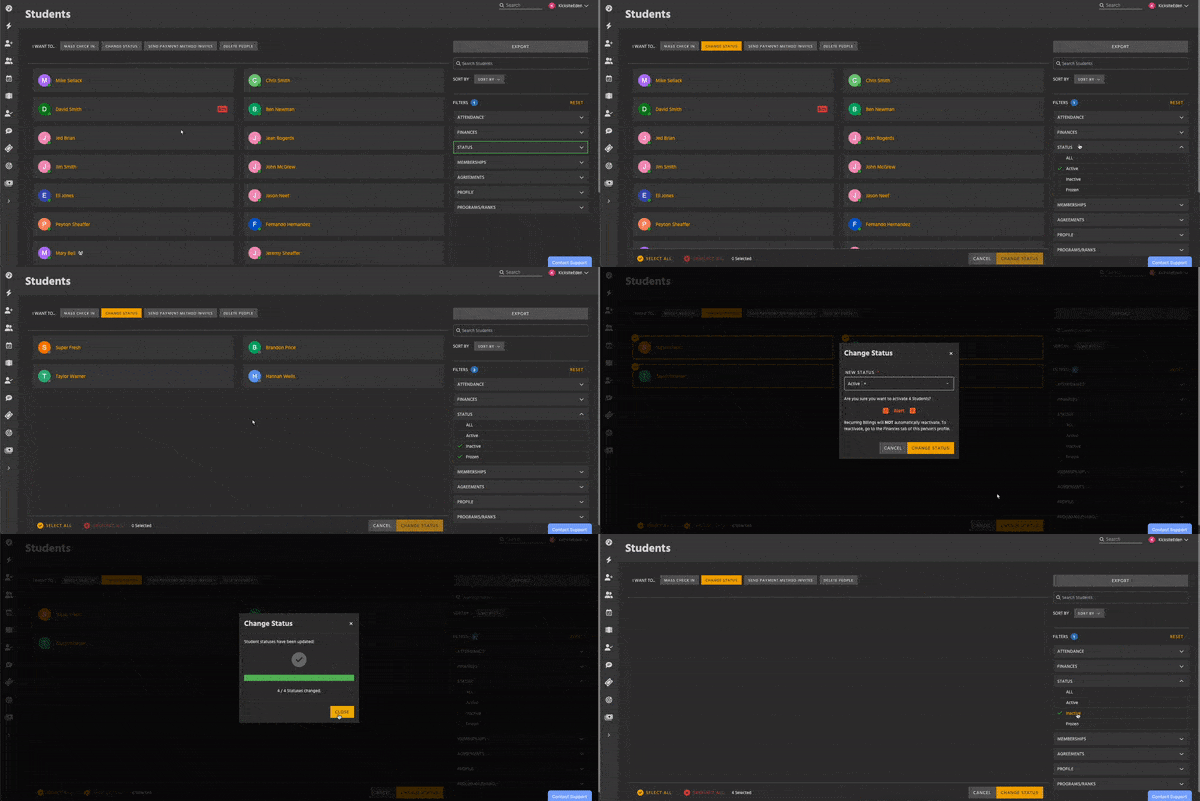
Change Status

Quickly change students’ status.
- Select the Change Status action.
- (Optional) Apply filters.
- Select the people you want by clicking on the cards behind their names, or use Select All.
- Selected cards have an outline and checkmark.
- Clicking a card a second time will de-select it. There’s also a Deselect All button for convenience.
- Click Change Status.
- On the confirmation screen, choose the new status for all the people you’ve selected.
- If you’re inactivating, this will also inactivate any recurring billings.
- Selecting people of multiple statuses will change them all to the same status.
- Click Change Status. The final screen shows the status change’s progress. Anyone who couldn’t have their status changed will be listed, with the reason why.
- You can close this screen at any time without canceling the action.
Send User Account Invites
Create Member Portal accounts for multiple Students at once. Learn more about the Member Portal here.
- Select the Send User Account Invites action. This applies three filters:
- Active status
- Has Email Address
- No User Account
- (Optional) Apply additional filters.
- Select the people you want by clicking on the cards behind their names, or use Select All.
- Selected cards have an outline and checkmark.
- Clicking a card a second time will de-select it. There’s also a Deselect All button for convenience.
- Click Send Invites.
- On the confirmation screen, choose any account restrictions.
- All sections of hte Member portal are on by default.
- Click a toggle to turn off that section for these Students.
- Click Create & Send. The final screen shows the invites’ progress. Anyone who couldn’t be invited will be listed, with the reason why.
- Each Student will be sent an email with their username and a temporary password.
- You can close this screen at any time without canceling the action.
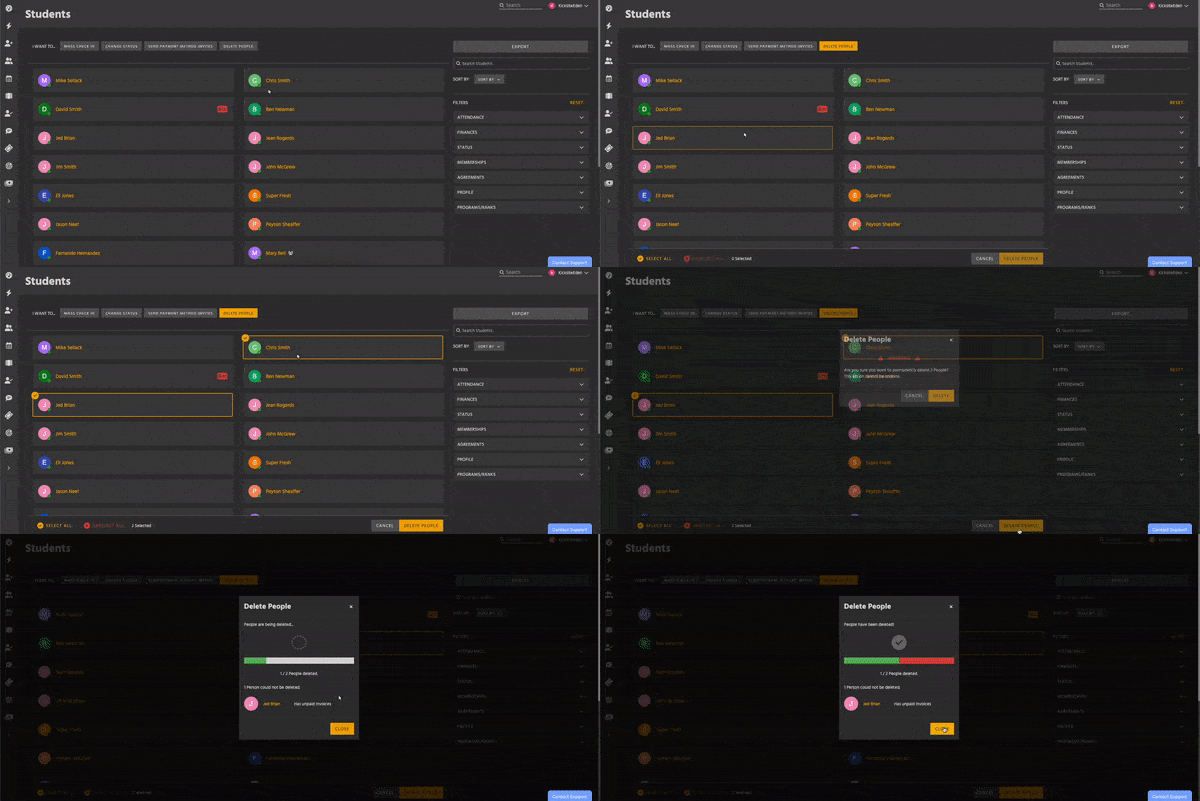
Delete People

Be careful – this action can’t be undone.
- Select the Delete People action.
- (Optional) Apply filters.
- Select the people you want to delete by clicking on the cards behind their names.
- Click Delete People.
- On the confirmation screen, read the alert about deleting students.
- Click Delete People. The final screen shows the deletion’s progress. Anyone who couldn’t be deleted will be listed, with the reason why.
- You can close this screen at any time without canceling the action.
Filters
Combining filters is a fast and easy way to narrow down your Student List. Select an option in the dropdown to apply it. If you filter before selecting an action button, the action will override your previous choices.
- To remove all filters, click Reset.
- Filters with options selected have a green outline.
- The blue bubble shows how many total filters are being applied.
You can use as many filters as you want; if no student cards remain, that means no one meets that combination of filters. For example, if you select “Has Payment Method” and “Has Past Due Invoices,” students must have both of those things to appear. There are two exceptions to this:
- Status
- For example, selecting both Inactive and Frozen will show inactive and frozen students.
- Programs/Ranks
- Similarly, selecting both Tae Kwon Do and Karate will show the students in Tae Kwon Do and the Students in Karate.
All Filters
Attendance
- Absent
- Already Checked In Today or Not Checked In Today
Finances
- Has Payment Method or No Payment Method
- Has Past Due Invoices
- Has Recurring Billing or No Recurring Billing
Status
Dots next to each Student’s profile picture also indicate their status.
- Active (green)
- Inactive (gray)
- Frozen (teal)
Memberships
- Has Membership
- No Membership
- Expiring Membership (within 30 days)
- Expired Membership
Agreements
- Has Signed Agreement
- No Signed Agreement
Profile
- Has Email Address or No Email Address
- Has Phone Number or No Phone Number
- Has User Account or No User Account
Programs
This is a list of all the Programs you have at your school. All ranks are selected by default. Click on individual ranks to view only those.