Best Practice: How to Add Revenue Streams
Adding more specific Revenue Streams (formerly called Payment Reasons) can help when it comes time to reconcile your business’ finances. If you’ve added Revenue Streams and have been careful about using them when you create invoices and set up recurring billings, it will be easier to sort your financial records.
How to add Revenue Streams:
1. Click the Quick Links icon, click Settings, and then click Finances. Alternatively, click your username in the upper-right corner, click Settings, and then click the Finances tab.
2. In the Revenue Streams section, type the name of the stream in the text field. Click the check mark or press Return/Enter. (Keep in mind that you need to keep the text to 125 characters or less. If you go over, you won’t be able to save the revenue stream.)
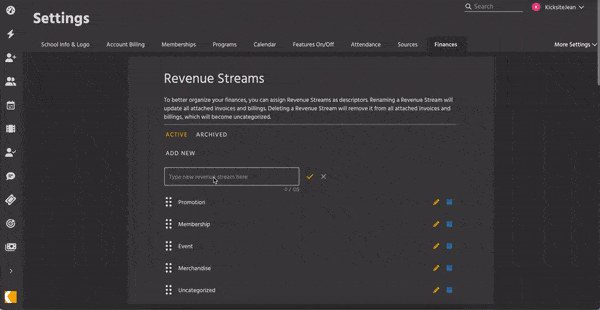
You can edit, archive, and delete a revenue stream as follows:
- To edit a revenue stream, click the Edit icon (it looks like an orange pencil) for the stream you wish to change. Edit the text and click the check mark or press Return/Enter.
- To archive a revenue stream, click the Archive icon beside the stream. (The Archive icon looks like a blue box.)
- To restore an archived revenue stream (to move it back to the Active tab), click the Archived tab, and then click the Restore icon (it looks like a green, circular arrow).
- To delete a revenue stream, click the Archived tab. Click the Delete icon (it looks like a red trash can). Click the Delete button to confirm that you want to permanently remove the revenue stream.
When you create an invoice or set up a recurring billing, be sure to select the correct revenue stream from the Revenue Stream drop-down list. (If you are on Classic Billing, this drop-down list will appear as Payment Reason.)
The revenue stream you select will appear in the Revenue Detail report.
To export the Revenue Detail report (Classic):
1. Click View on the dashboard (it’s right beside Vitals).
2. Click Revenue on the menu bar.
3. (You may need to scroll down.) Click the Export to Excel link on the Revenue Detail bar. A .csv file downloads.
In the Excel file, you can sort or filter by the Payment Reason column to get more detailed information about your business’ revenue.