How to Edit a Recurring Billing
Sometimes Recurring Billings need to be edited to adjust price, tax, or other details. You can easily make these changes to affect future invoices.
Editing a Recurring Billing
- Navigate to a Recurring Billing’s details page. This can be done several ways:
- From the Recurring Billings section of Finances
- From the Finances module on a person’s profile
- Clicking on a link to a Recurring Billing (such as on the Memberships list)
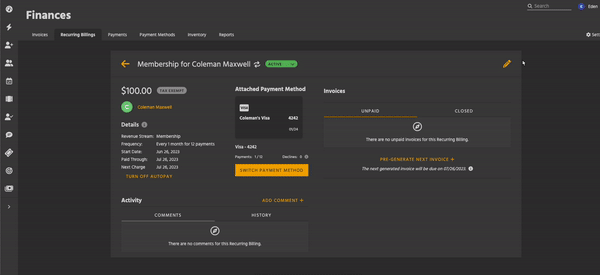
- Click the Edit icon (yellow pencil) in the upper right. This opens the Edit Recurring Billing window.
- You can edit the following details on Recurring Billings:
- Amount: can change to any amount greater than 0.00.
- Tax: can toggle off / on, and can change tax rate.
- Revenue Stream: can change to any other active Revenue Stream. This also changes the title of the recurring billing.
- Occurrences: unlimited or a set number of occurrences. Can’t be less than the current number of invoices in the recurring billing.
- Start Date: can be changed to any date in the future.
- Frequency: can be adjusted to any daily, weekly, monthly, or yearly frequency.
- Any future invoices with no payments or credit applied will be re-generated to match the edited terms.
- In the Activity section, the History tab shows what details were changed, along with the Kicksite user that made the change.
- Editing a Recurring Billing sends a notification email to the attached person. Please note that editing a Recurring Billing will not affect its autopay status.
Status Changes to Recurring Billings
Inactivate a billing: click the Active bubble next to its title and select Inactive.
- Inactive billings won’t generate new invoices, and Autopay will be turned off.
- If the billing is for a Membership, make sure to inactivate that as well.
Reactivate a billing, click the Inactive bubble next to its title and select Active.
- Choose a resume date (when the billing will reactivate).
Archive a billing, click the Archive icon (blue file box) in the upper right.
- You must inactivate a billing before archiving it.
- You can’t delete Recurring Billings or their invoices to comply with accounting best practices. However, archiving helps you keep your system tidy and still maintain records.
- Profiles won’t show Archived Recurring Billings. You can find them in the Finances section.
Other Changes
To toggle autopay, click the Turn On Autopay or Turn Off Autopay button at the bottom of the Details section.
- You need a merchant account to collect payments through Kicksite and use autopay. Click here to find out how to request a merchant account.
- Turning autopay on for the first time requires you to attach a payment method to the recurring billing.
To change an attached payment method, click the Switch Payment Method button.
- You need a merchant account to attach a payment method and collect payments through Kicksite.
- You can select a payment method already saved to that student’s profile, or add a new one.
- If the student is part of a family, any payment methods added to the family profile will also be available for each member.
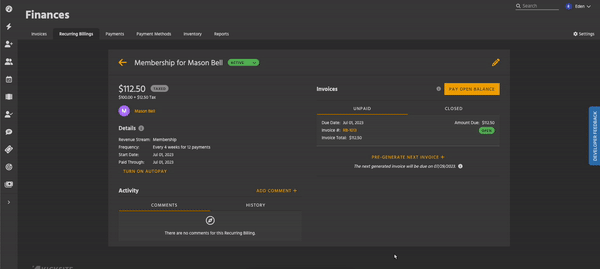
pay one or more invoices ahead of their due dates, go to the billing’s details page. Then, click the Pre-Generate Next Invoice button at the bottom of the Unpaid Invoices tab.
- The system automatically generates invoices one at a time. However, pre-generating invoices lets you pay farther into the future.
- You can pre-generate as many invoices as you want, up to the billing’s maximum (if it has one).
- To pay all invoices, including pre-generated ones, click the Pay Open Balance button. If you want to make a partial payment, you can change the amount in the Payment Amount field. Remember, you need to pay Recurring Billing invoices oldest to newest.