How to Create a New Membership Template
Memberships are the best way to bill people, allow them to check in, and add them to a Program for a certain amount of time. They’re first created as Membership Templates, then easily used across Kicksite. To learn how Memberships work, click here.

Creating a Membership Template
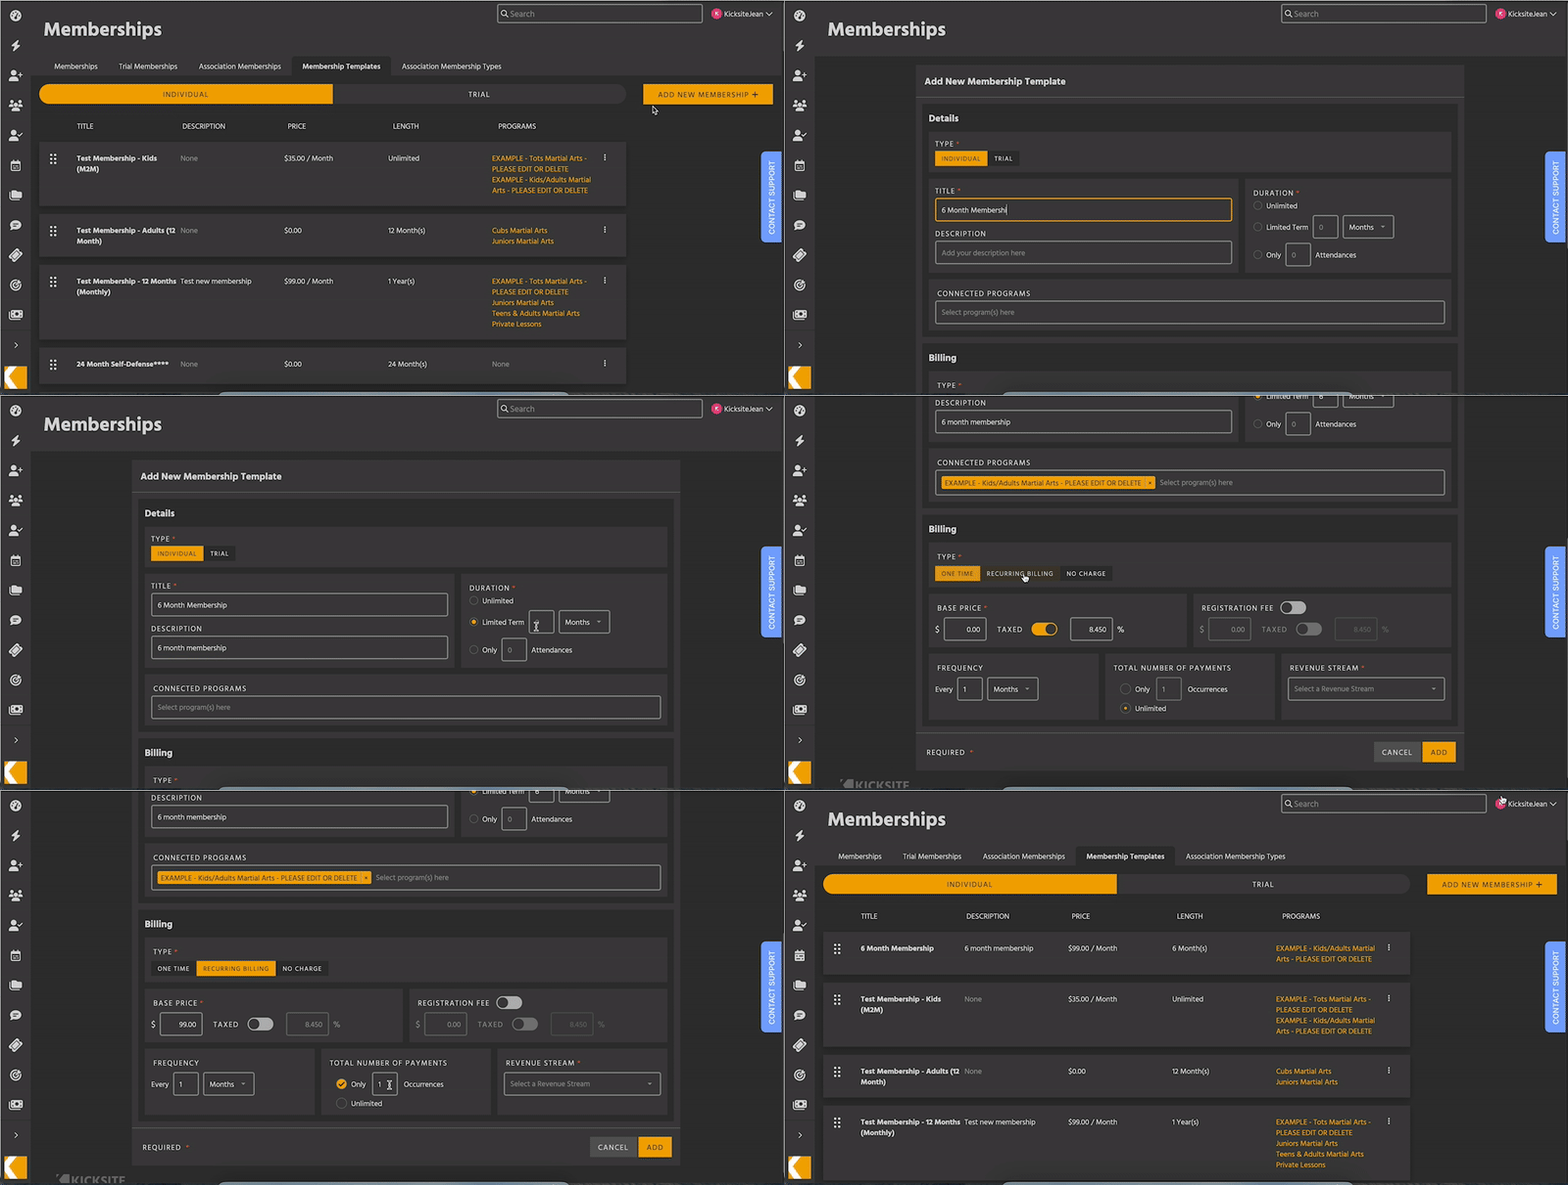
- First, open Quick Links (the lightning bolt in the sidebar). Then, search for Membership Templates, or click Memberships > Membership Templates.
- You can easily open Quick Links by clicking
/on your keyboard.
- You can easily open Quick Links by clicking
- Click the Add New Membership button in the upper right.
- Enter a title.
- (Optional) Enter a description.
- Select a duration:
- Unlimited
- Limited Term: A specific time frame, such as 6 months or 1 year.
- Only x Attendances: Also known as a punch card. A student can only attend a set number of classes.
- Select all related Programs.
- At least one Program is required for punch card memberships.
- Select a billing option.
- One Time: A single charge, such as for an up-front payment.
- Recurring Billing: Charge for a set number of payments or an unlimited duration.
- (Optional) Set up taxes.
- You can set default tax rates for each billing option in the Finances settings tab.
- (Optional) Set up a registration fee.
- Select a Revenue Stream.
- Most schools use a Revenue Stream called Memberships.
- You can add, edit, and reorder Revenue Streams in the Finances settings tab.
- Click Add to finish.

Creating a Trial Membership Template
- First, open Quick Links (the lightning bolt in the sidebar). Then, search for TrialMembership Templates, or click Memberships > Trial Membership Templates.
- You can easily open Quick Links by clicking
/on your keyboard.
- You can easily open Quick Links by clicking
- Click the Add New Membership button in the upper right.
- Enter a title.
- (Optional) Enter a description.
- Specify a Trial Start Criteria.
- Select a duration. You can use one, or both – whichever occurs first will end the
- Limited Term: A specific time frame, such as 6 months or 1 year.
- Only x Attendances: Also known as a punch card. A Prospect can only attend a set number of times.
- Select all related Programs.
- At least one Program is required for punch card Trial Memberships.
- Select a billing option.
- One Time: A single charge, such as for an up-front payment.
- Trial Memberships can’t have Recurring Billings.
- (Optional) Set up taxes.
- You can set default tax rates in the Finances settings tab.
- (Optional) Set a Registration Fee.
- Select a Revenue Stream.
- Most schools use a Revenue Stream called Memberships.
- You can add, edit, and reorder Revenue Streams in the Finances settings tab.
- Click Add to finish.
Managing Membership Templates
Click the kebab menu (three vertical dots) to edit or delete a template. Deletion is permanent, and will prevent any Students or Prospects from signing up for it. Exercise caution. If there’s anyone signed up for this Template, it can’t be deleted.
To rearrange the Templates, click the gripper dots on the left side of a card and drag. This changes their order in Student Sign-Up and in dropdown menus.
Next Steps
To sign a Student up for a Membership, use the Student Sign-Up process, or choose it on the Add New Student form. You can also add Membership Templates to Landing Pages, and select them when creating a new Student.