How to Create a New Employee
Employee accounts enable your staff to have their own logins to your Kicksite account. Remember, it is best practice to never share your admin username and password.
Note: Only an administrator can create an employee.
Click the following link to watch a video showing how to create a new employee.
To create a new employee:

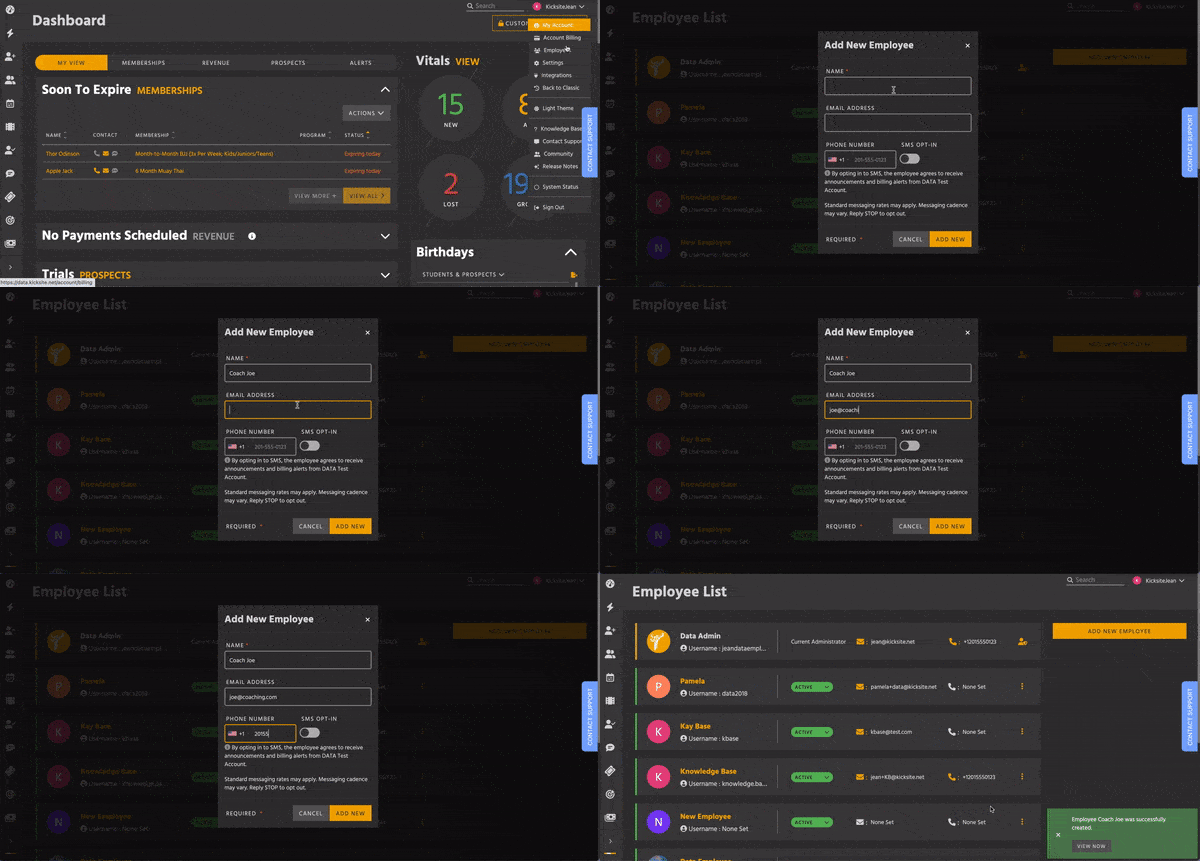
1. Click Quick Links in the left panel, click Employee, and then click Add New Employee. Alternatively, click your username in the upper-right corner, click Employees, and then click the Add New Employee button at the top right.
2. In the Name field, type the employee’s first and last name. (If needed, you can include a middle name, but it is not required.)
3. Enter the email in the Email Address field (you need to add an email address to create a user account).
4. (Optional) Type a phone number in the Phone Number field; click the SMS toggle if you want the employee to receive texts.
5. Click the Add New button.
A green box appears, confirming that you successfully added a new employee. Click View Now in the green notification to go to the employee’s profile.
To restrict access to features:
If needed, you can restrict the employee from accessing certain features from their employee account.

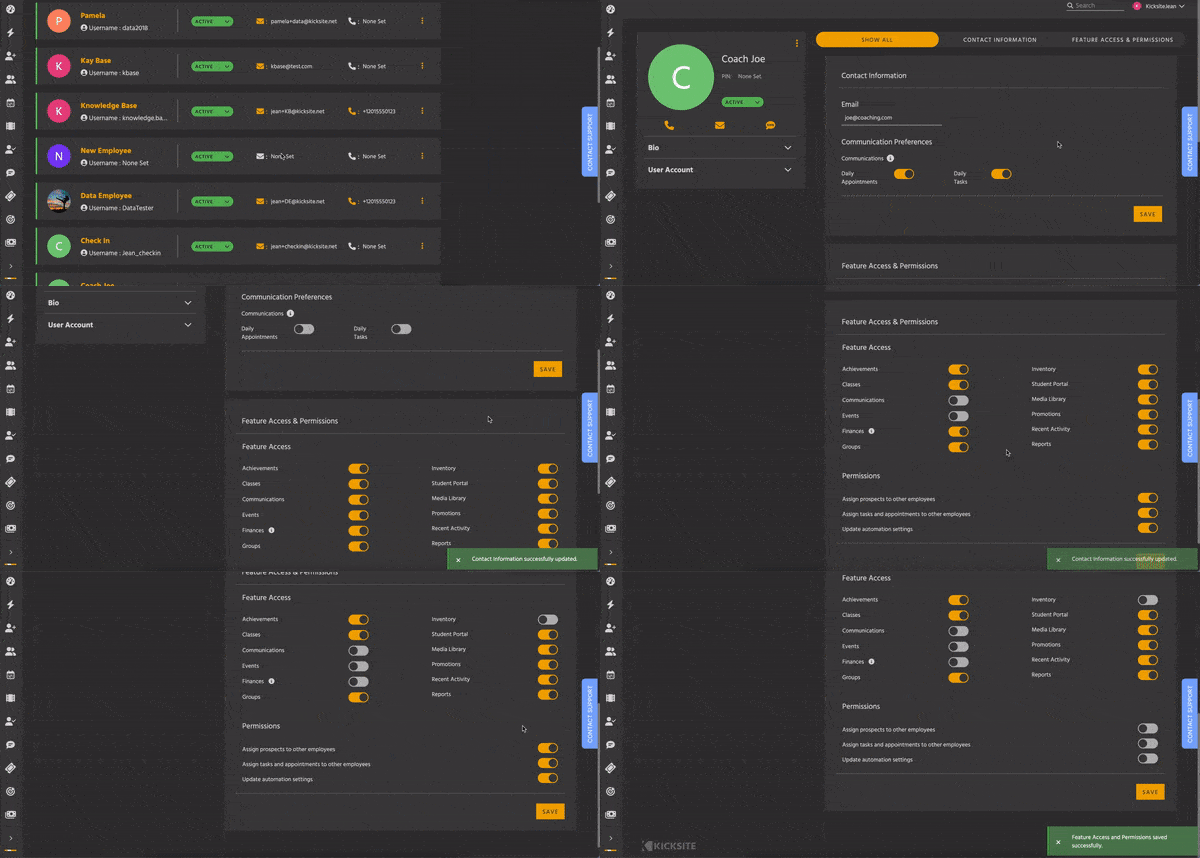
1. Click the new employee’s name in the Employee list. Alternatively, start typing the employee’s name in the Search box and click the correct result.
2. The Employee Profile page appears; it looks and functions much the same as the Student Profile or Prospect Profile page. If you click Bio, you can edit or add contact information about the employee.
3. (Optional) To restrict the employee from receiving daily emails about appointments and/or tasks, in the Contact Information section, click the Daily Appointments and/or Daily Tasks toggles to off. Click the Save button if you made a change.
4. In the Feature Access & Permissions section, click a toggle to turn off that feature or permission.
Click the Save button if you made a change.
Feature Access:
- Achievements: Unable to view the achievements page.
- Classes: Unable to view or update class day/time (in Program Settings) or in the Calendar.
- Communications: Unable to view or send email/SMS messages.
- Events: Unable to view or create events.
- Finances: Unable to view the Finances page or Finances modules (on Dashboard or prospect/student profiles). (If you disable Finances, make sure to also disable Inventory.)
- Groups: Unable to view or update Groups.
- Inventory: Unable to view or update Inventory. (If you disable Inventory, make sure to also disable Finances.)
- Student Portal: Unable to view or edit the User Account section on student profiles.
- Media Library: Unable to view or add documents/videos to the Media Library.
- Promotions: Unable to view the Promotions page, unable to view or add promotions on student profiles.
- Recent Activity: Unable to view the Recent Activity module on the Dashboard.
- Reports: Unable to view financial or attendance reports.
Permissions:
- Assign prospects to other employees: Employee can add their own name in the Assignment section on the prospect profile, but cannot assign other employees.
- Assign tasks and appointments to other employees: Employee can add their own name in the New Task or New Appointment window, but cannot assign other employees.
- Update automation settings: Employee cannot access Automated Messages (if they do have access to Communications).
(The screenshot below shows an account with all features and permissions turned off because this employee account is meant for attendance check in only.)
To send the employee an email to log in to their employee account:
Click the User Account section in the left column, and then click the Create button. (Note that the employee must have an email address to create a user account.)
A link to sign in will be emailed to the employee at the email address you entered in the Add New Employee pop-up.
For the employee: Sign in and update the account password:
Check your email and open the message with the subject “School Name Account Created”.
Recommended: Copy the password, and then click the Sign In Now link in the email.
Type the username and paste the password supplied in the email.
To update the password:
1. Click your username in the upper-right corner and then click My Account.
2. You may need to scroll down; in the Credentials section, click the Password row.
3. In the Current Password field, type or paste the current password.
4. In the New Password and New Password Confirmation fields, type the new password.
5. Click the Save button.