How to Set Appointments and Tasks
Appointments and tasks help you and your staff organize your schedule.
Click the following link to watch the video that shows how to create a new appointment or task.
To set an appointment or task for a prospect:
1. In the left panel, click Profiles and then click Prospects.
2. Scroll down the Prospects List or click in the search field and start typing the prospect’s name to find the prospect you wish to update.
3. In the Prospects List, if the prospect does not already have an appointment or task scheduled, you will see links Schedule Appointment + and Schedule Task +. Click the appropriate link to schedule an appointment or task. If you used the search field and went to the Prospect Profile, click Appointments & Tasks in the left column to expand that section, and then click the Add New+ button.

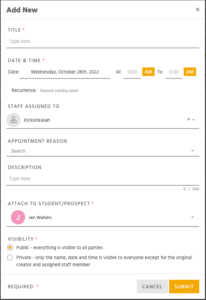
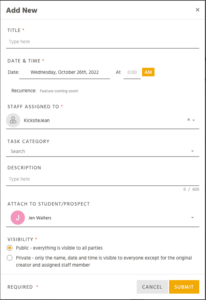
4. A pop-up window enables you to type a Title, set the Date, set the time (start time and end time for an appointment), assign it to an employee, select an Appointment Reason or Task Category, and enter any notes in Description. Click the Submit button to save the appointment or task.
- An email notification will be sent to the prospect as soon as an appointment is scheduled.
- The prospect will have the ability to confirm or decline the appointment immediately from the email.
- The scheduled appointment or task date and time will appear on the prospect.
- To view only prospects with scheduled appointments, click Appointments at the top of the Prospects screen.
- On the right side of the screen, the day’s appointments and tasks are displayed under the calendar.