Are you a student trying to sign in? Click here!

How Can We Help?

New Finances: How to Refund or Correct Payments


This article covers the new, uplifted finances, which is currently only available to select customers.

If you’re just getting started with finances in Kicksite, we recommend that you review Finances settings.

What do you need to do?


At some point, you will need to make a correction to a payment, whether that’s to inactivate a recurring billing, credit an invoice, refund a payment, or a similar action. This article shows you how to make common “corrections” to payments.


How to refund a payment

If you need to refund a payment, keep in mind that you will have to refund the full invoice. (Partial refunds may become available later, but at the time of this writing, only full refunds are available.)

1. To refund a payment, first find the invoice that you need to refund; you can find it in two places:

  • Click the Finances icon in the left panel, and then click the Payments tab. You can sort by the Date or Name column to more easily find the payment that needs refunded.
  • Go to the student’s or prospect’s profile by typing their name in the Search field, and click the correct result. In the Finances module, click the Payments tab. If they have a lot of payments, you can click the View More or View All button to find the payment that needs refunded.

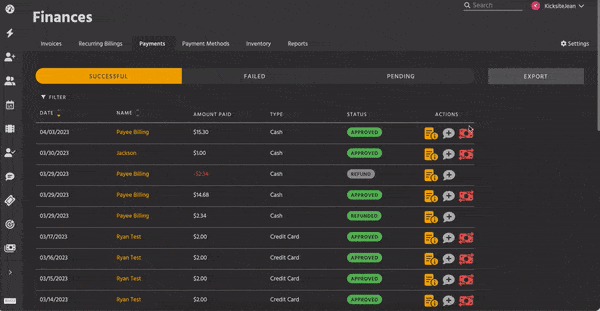
2. When you find the correct payment, click the Refund icon.

3. In most cases, you will want to leave the Refund and Issue $XX Credit check box selected. If the invoice still needs to be paid, select the Refund with No Credit check box. (For example, if the student asked to pay an invoice using a different payment method, you would want to select the Refund with No Credit check box so you could refund the original payment and accept a new payment.)

4. Type a short description of why you’re issuing a refund in the Reason for Refund text field.

5. Click the Refund button.


How to edit a recurring billing

You can waive one or more payments on a recurring billing, for example, if a student will be absent for one or more months, or if you want to waive a month’s payment for a student for a referral bonus or similar reward. (If you need to refund a payment on a recurring billing, see the steps in the “How to refund a payment” section.)

Keep in mind that in the classic billing, you could adjust the next payment date. In the new finances uplift, you can’t adjust the next payment date. This change ensures that you have accurate records of payments and credits for all recurring billings. If you need to change the next payment date in new finances, you will need to inactivate the current recurring billing and create a new recurring billing to start on the new date.

If you need to stop a recurring billing, you can inactivate it. Note that in classic billing, you could delete recurring billings; in new finances, you can’t delete an invoice or recurring billing to preserve all payment history.

Read on for the steps to edit a recurring billing:

1. Find the recurring billing that you need to edit; you can find it in two places:

  • Click the Finances icon in the left panel, and then click the Recurring Billings tab. You can sort by the Next Charge or Name column to more easily find the recurring billing that needs changed.
  • Go to the student’s profile by typing their name in the Search field, and click the correct result. In the Finances module, click the Recurring Billing tab.

2. On the Finances page or on the student’s profile, click the link in the Title column to open the recurring billing’s details. The title of the recurring billing will be the payment reason and the student’s name; for example, Membership for Student Name.

3. Edit the recurring billing as needed:

  • To inactivate the recurring billing (stopping payments), click the Active drop-down list and select Inactive.
  • To turn autopay on or off, click the Turn On Autopay or Turn Off Autopay link below the details. If the recurring billing did NOT have autopay on when it was created, you will see the Set Up Autopay window; select the correct payment method and then click the Confirm Autopay button. (Note: If you do not process billing with Kicksite, you will not have this option.)
  • To change the card charged, click the Switch Payment Method button. Click the desired payment method; if you need to add a new card, click the +Add New Card button and enter the card information; click the Switch button. (Note: If you do not process billing with Kicksite, you will not have this option.)
  • To add a comment, click the Add Comment+ link, type the comment, and click the Save button.
  • To credit (waive) one or more future payments, click the Pre-Generate Next Invoice+ link. Click the invoice number for the next payment (the top payment, if you have generated multiple invoices). Click the Credit button. If you want to give a partial credit, edit the amount in the Credit Amount field. Type a reason in the Reason for Credit field, and then click the Confirm button.
  • To pay one or more future payments ahead of the due dates, click the Pre-Generate Next Invoice+ link. To pay all the pre-generated invoices, click the Pay Open Balance button. If you want to make a partial payment, you can edit the amount the Payment Amount field. Click the Choose Payment button; select the payment method from the drop-down list and click the desired payment method. Click the Pay Now button.