-
How To Articles
-
-
-
- How to Create a Family
- Student Profile
- How to Update a Student's Information on the Student Profile
- How to Inactivate or Freeze on the Student Profile
- How to Use the Student List / Member List
- How to Use Student Sign-Up
- How to Create a New Student
- How to Create and Add Awards
- Prospect and Student Statuses
- How to Use Agreements
- How to Use the Programs Section (Ranks Overview, Eligible to Promote, Promotions)
-
-
-
-
-
- How to Use the Kiosk Check-in Screen
- How to Create a Kiosk Check-in Screen Shortcut (Chrome)
- Tip: How Do I Print PINs for Student Attendance Check In?
- Tip: How to Use a Kindle Fire Tablet for the Kiosk Check In Screen
- Best Practice: How to Create an Employee Account for Attendance
- How to Use Mass Check In
- How to Print Barcode Labels for Attendance Check In
-
-
-
-
-
How To Videos
-
Getting Started
-
- Step 1: Get Up and Running with Kicksite
- Step 2: Customize Settings to Work for Your School
- Step 3: Basic Kicksite Tasks
- Step 4: Get Finances Set Up
- Step 5: Bring in New Students with Marketing Tools
- Step 6: Keep Students Connected
- How to Create a New Membership Template
- How to Create a New Student
- How to Use the Programs Section (Ranks Overview, Eligible to Promote, Promotions)
-
-
FAQs
-
- Best Practice: How to Create an Employee Account for Attendance
- Best Practice: How to Add Revenue Streams
- Tip: How Do I Print PINs for Student Attendance Check In?
- Tip: How to Delete a Program or Rank with Students Attached
- Tip: Use Programs to Track Employee Time
- Tip: How to Use a Kindle Fire Tablet for the Kiosk Check In Screen
The Student Sign-Up feature in Kicksite allows you to easily enroll students in programs, sign them up for memberships, and collect payment for those memberships.

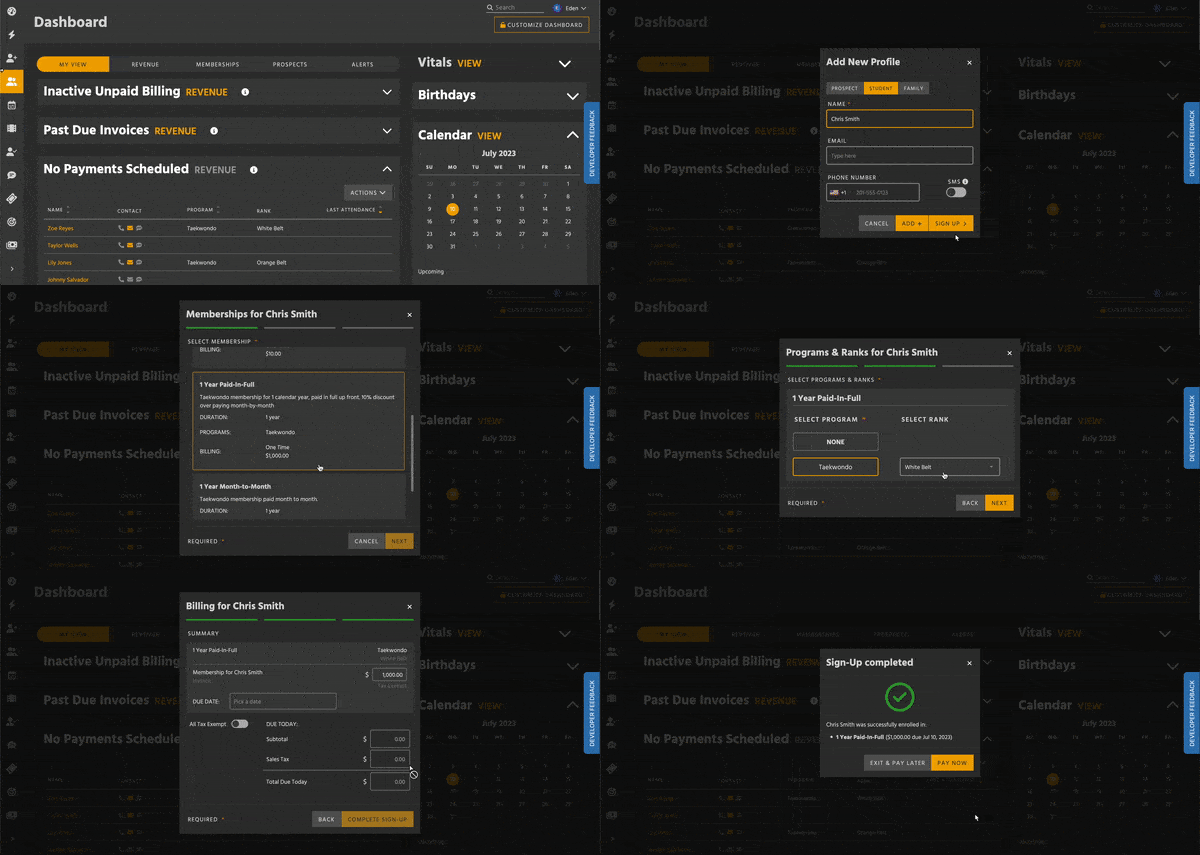
Using Student Sign-Up from Add New Profile.
Entering Student Sign-Up
There are two ways to get to Student Sign-Up:
- Create a new student and, instead of clicking Add, click Sign Up.
- Go to the Membership module of an existing student’s profile, then click the Sign Up button in the upper right.
Using Student Sign-Up
- Select at least one membership. Your school’s memberships are listed as cards, with short summaries of their details. Click on a card to select it.
- If there is no information in these cards, go to Membership Settings to set up your memberships.
- Schools with Classic memberships can continue using memberships migrated from Classic, but consider updating their settings to make future Student Sign-Ups easier.
- Choose a program to go with each membership you’ve selected. Each program requires a rank, chosen from the drop-down on the right.
- If you don’t want to attach a program, or if your school doesn’t use programs, click None.
- If a student is already enrolled in a program, you can’t change their rank in this step. Instead, use the Promotions module on their profile after completing Student Sign-Up.
- Set up the billing information for each membership on the Summary page.
- Admins can edit the price of a membership using the text box on the upper right of each membership’s section.
- To make all memberships tax free, turn on the Tax Exempt toggle at the bottom left of the summaries.
- Choose a Due Date (Invoice) or Start Date (Recurring Billing) for each membership’s billing.
- Even if a membership’s billing date is in the future, the membership will activate immediately after completing Student Sign-Up.
- Billings with a Start Date or Due Date of today will be shown in the Subtotal, Sales tax, and Total Due Today boxes. If these boxes are empty, it means all billing dates are in the future.
- Click the Complete Sign-Up button. A confirmation screen will appear with a list of the membership(s) you signed the student up for.
- The student is now enrolled in all selected programs and memberships, and invoices / recurring billings have been generated.
- Click either Exit and Pay Later or Pay Now. Clicking Pay Now will open the Pay Open Balance window.
Saving your progress and continuing later
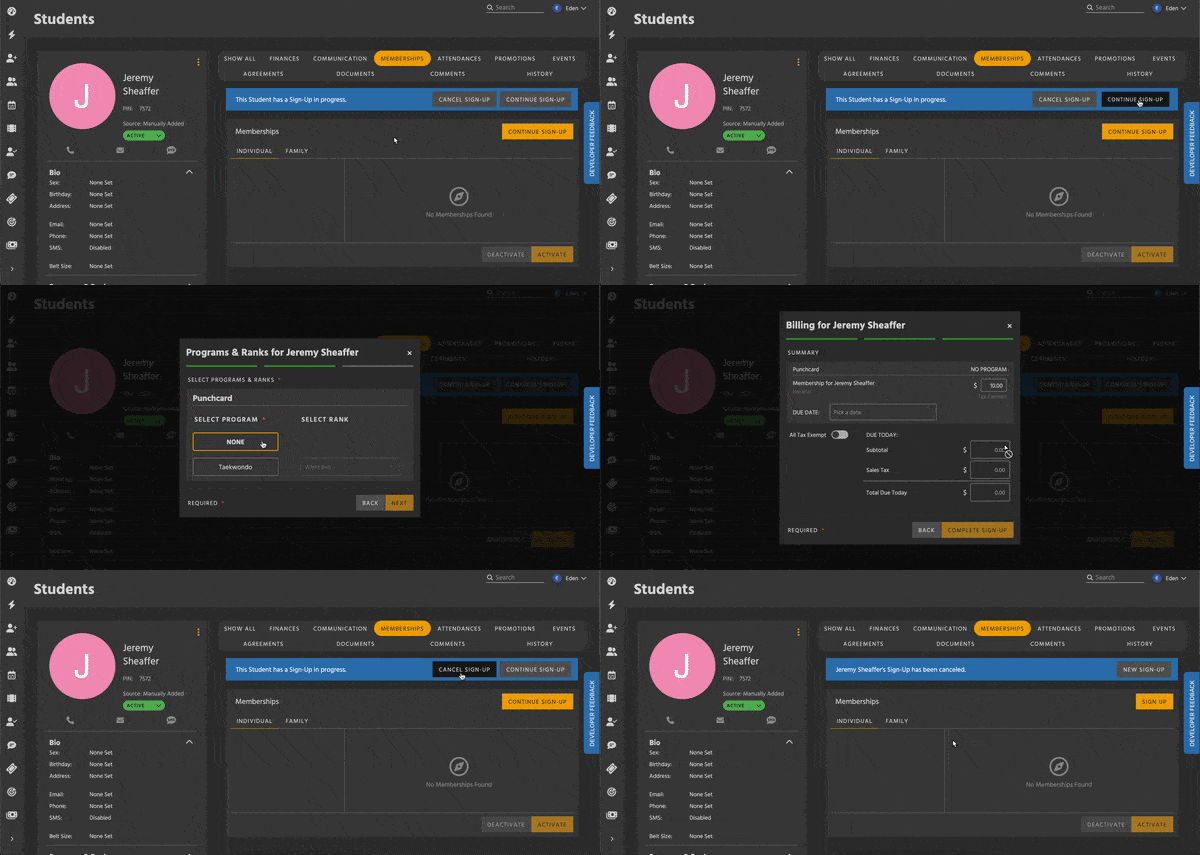
Student Sign-Up lets you exit and resume work later. However, you must fully complete a step and click Next for progress to save.

Navigate to a student’s profile to resume or cancel a Sign-Up.
If you or another user worked on a Student Sign-Up and didn’t complete it, navigate to the blue banner at the top of that student’s profile. You can resume by clicking Continue Sign-Up, or click Cancel Sign-Up to discard the Student Sign-Up entirely. The banner will disappear once the Sign-Up is complete, or if it’s canceled.