How to Add a Class Schedule with the Scheduler
Kicksite is launching a new feature to help you keep track of your weekly class schedule and to enable prospects to schedule their first class: The Scheduler.
Remember: The Scheduler is in beta, which means that not all the capabilities are ready, and that you might encounter a bug. Also, as of this writing, the Scheduler requires that you have billing with Kicksite to add the schedule to a Landing Page to allow prospects to schedule a first class and to select and pay for a membership. (If someone selects and pays for a regular membership, they will be entered into Kicksite as a student.)
If you wish to allow students to schedule classes, they will be able to do so on the updated Member Portal (their student user account). Click here to find out how to send invitations to the student user account; click here for an overview of the uplifted Member Portal.
First Steps
Make sure you set up Memberships and Programs and Ranks before you add your regular, weekly class times.
How to set your weekly class schedule in Program Settings
You can add class times in Program Settings to create your weekly schedule. When you enter a class time for a program, the day and time for that program will automatically repeat infinitely into the future.
1. In the left panel, click Quick Links. Click Programs, and then click Program & Rank Settings. Alternatively, click your username in the upper-right corner and then click Settings. Click the Programs tab.
2. If you haven’t yet set up programs and ranks, here is how to add programs and ranks. If you have programs and ranks set up, click the program name that you want to add class times to.
3. Click the pencil icon next to Regular Weekly Class Schedule.
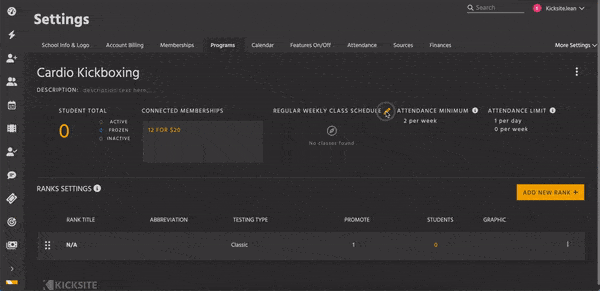
4. Click the Add New Class + button.
5. In the Add New Class window, add the class schedule and information:
- Name: Type a name for the class and press Tab or Return/Enter. We suggest adding the program or class type, day, and time to make sure it’s clear on the Calendar what the class is. For example, Yoga Monday 6:00pm or Kids BJJ Thursday 4:30.
- Regular Class Schedule: Select the Day from the drop-down list. Type the start time and end time. Click AM to change the time to PM if the class is in the afternoon or evening.
- (Optional) Staff Assigned To: From this drop-down list, select an employee’s name. You can leave this blank if desired.
- (Optional) Description: Type a description of the class.
- (Optional) Maximum Capacity: If you need to limit the number of students for the class, type the number in this field. (As of this writing, students can not yet register for classes. This capability will be added later.)
- (Optional) Cut Off Time Frame: If you’d like to have a period of time before class that students can not register for the class, enter the number of in the Time Frame field and select the unit (Minutes, Hours, or Days) from the drop-down list. For example, if you need to know how many students have registered at least 2 hour before class starts, enter 2 in the field and select Hour(s) from the drop-down list.
- (Optional) Remote Class Hyperlink: If this class is online, enter or copy/paste the link to the Zoom meeting or other online meeting in this field.
6. Click the Submit button to add the class to the weekly schedule.
The class appears on the schedule in the selected day and time slot. To edit a class, click the pencil icon beside the class. Use the Edit Class window to make any needed changes; click the Update Class button to save your changes. To delete the class, click the Delete button in the Edit Class window.
Repeat Steps 4-6 for each class that applies to the selected program. To add classes to other programs, repeat Steps 2-6.
How to add a single class on the Calendar
If you need to add a single class, rather than a regular weekly class, add it on the Calendar. Some examples of single classes you might want to add on the Calendar are a special class for testing prep, a seminar for referees, a class run by a guest instructor, or a private lesson.
Note: If you have already entered regular, weekly classes in Program Settings, you will see those classes on the Calendar. If you edit a regular, weekly class, keep in mind that you are only editing that single instance of the class. The steps to edit a class are the same as adding a new, single class.
1. On the left panel, click the Calendar icon.
2. Click the Add New button.
3. At the top of the Add New window, click Class.
4. From the Program drop-down list, select the desired program.
5. In the Name field, type a name for the class. Because this is a single class, and not a regularly scheduled class, you may want to add a little more information in the class name to indicate this is a special class.
6. Under Date & Time, select the date from the calendar picker. Type the starting and ending times. If needed, click AM beside the start and/or end times to change the time to PM.
7. (Optional) The following options are not required, but you may wish to use one or more:
- Select an employee from the Staff Assigned To drop-down list.
- Type a little more information about this class in the Description field.
- Under Maximum Capacity, enter the number of students for the class’s limit.
- Under Cut Off Time, enter the number of minutes before the class that students may register. For example, enter 30 to stop allowing students to register 30 minutes before the class starts.
- If the class is online, enter or copy and paste in the Zoom or other meeting link in the Remote Class Hyperlink field.
8. Click the Submit button to add the single class to the Calendar.
How to delete a class on the Calendar
If you need to cancel one or more regularly scheduled classes (for example, due to inclement weather, holiday, or special seminar), you can delete the class on the Calendar.
1. On the left panel, click the Calendar icon.
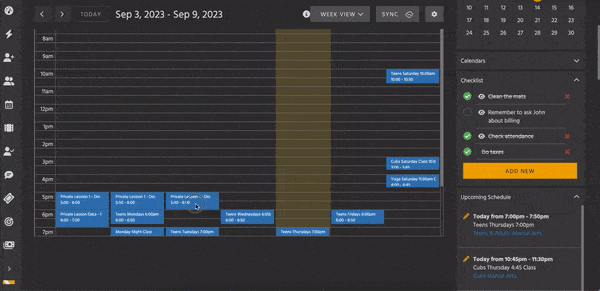
2. Find the day for the class you wish to delete. You can use the left and right arrows at the top of the Calendar to move forward or backward in time. You can also select a different view from the drop-down list (Month View, Week View, Day View, or List View) to help you find the specific class.
3. Click the class entry on the Calendar, and then click the > arrow to edit that specific class.
4. At the bottom of the Edit Class window, click Delete. Click Delete in the pop-up that appears to confirm that you do wish to delete the class.
What’s Next?
After you set up your regular, weekly class schedule for all your programs, you may want to add your Scheduler to a Landing Page to enable prospect to select their first trial class. (Note: As of this writing, you must have billing with Kicksite to add the Scheduler to a Landing Page.)