How to Update Finances Settings
Before you start billing your students or members, the best practice is to go to the Finances settings and make sure the settings are correct for your school. For example, make sure to enter the correct tax rate for your location before you sell taxable merchandise.
Read on for how to review and update the Finances settings.
How to add Revenue Streams settings
Revenue Streams are a way to categorize your revenue so that you can easily see where you’re making money. You select a Revenue Stream when you create an invoice or recurring billing. The Collected Revenue by Revenue Stream report breaks down the payment totals for each Revenue Stream. For example, if you added Summer Camp as a Revenue Stream, you can review the Collected Revenue by Revenue Stream report to find out how much you collected from the summer campers.
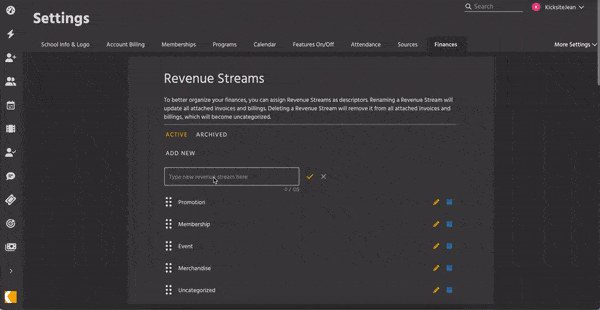
1. Click your username in the upper-right corner, click Settings, and then click the Finances tab. Alternatively, click the Finances icon in the left panel, and then click Settings (near the top right corner).
2. In the Revenue Streams section, type the name of the reason in the text field. Click the check mark or press Return/Enter. (Keep in mind that the maximum characters is 125 characters.)
You can edit, archive, and delete a Revenue Stream as follows:
- To edit a Revenue Stream, click the Edit icon (it looks like an orange pencil) for the reason you wish to change. Edit the text and click the check mark or press Return/Enter.
- To archive a Revenue Stream, click the Archive icon beside the Revenue Stream. (The Archive icon looks like a blue box.)
- To restore an archived Revenue Stream (to move it back to the Active tab), click the Archived tab, and then click the Restore icon (it looks like a green, circular arrow).
- To delete a Revenue Stream, click the Archived tab. Click the Delete icon (it looks like a red trash can). Click the Delete button to confirm that you want to permanently remove the Revenue Stream.
How to add Payment Type settings
Payment Types describe what method (such as cash, check, or card) the customer uses to pay you. If you take payments via other means, for example PayPal or Venmo, you can add the other types in the Payment Type settings.
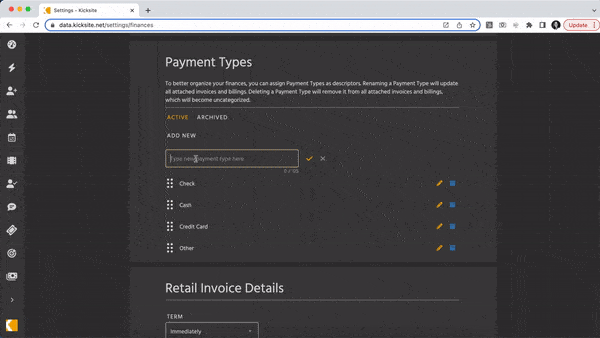
1. Click your username in the upper-right corner, click Settings, and then click the Finances tab. Alternatively, click the Finances icon in the left panel, and then click Settings (near the top right corner).
2. In the Payment Types section, type the name of the reason in the text field. Click the check mark or press Return/Enter. (Keep in mind that the maximum characters is 125.)
You can edit, archive, and delete a Payment Type as follows:
- To edit a Payment Type, click the Edit icon (it looks like an orange pencil) for the type you wish to change. Edit the text and click the check mark or press Return/Enter.
- To archive a Payment Type, click the Archive icon beside the Payment Type. (The Archive icon looks like a blue box.)
- To restore an archived Payment Type (to move it back to the Active tab), click the Archived tab, and then click the Restore icon (it looks like a green, circular arrow).
- To delete a Payment Type, click the Archived tab. Click the Delete icon (it looks like a red trash can). Click the Delete button to confirm that you want to permanently remove the Payment Type.
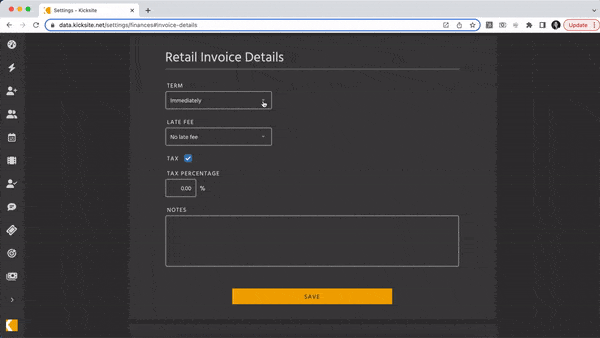
How to update Retail Invoice Details settings
The Retail Invoices Details settings enable you to set up defaults for invoices, such as whether you charge a late fee, if tax applies, and if so, what the tax percentage is.
1. Click your username in the upper-right corner, click Settings, and then click the Finances tab. Alternatively, click the Finances icon in the left panel, and then click Settings (near the top right corner).
2. Scroll down to the Retail Invoice Details section.
3. (Optional) The Term determines when the invoice must be paid before it is considered past due; Immediately is the default value. To change the Term, select an option from the Term drop-down list. If you choose Custom Term, the Days field will appear; enter the number of days.
4. (Optional) If you want to charge a late fee when an invoice becomes past due, select an option from the Late Fee drop-down list. The default is No Late Fee, so no late fee would be charged; you can choose a percentage or Flat Fee. If you choose Flat Fee, the Custom Late Fee field appears; enter the amount for the fee.
Keep in mind that if you charge a late fee, it will only be charged one time, when the invoice becomes past due. For example, if your Term selection is Immediately, you have until the end of the day to enter a payment. If the invoice is not paid, the late fee will be applied tomorrow. The late fee will be generated on a separate invoice that’s attached to the original, so can pay the full amount (the original price plus the late fee) at one time.
5. (Optional) Select the Tax Invoice check box if you need to charge taxes (such as sales tax or other taxes). If you select Tax Invoice, the Tax Percentage field appears; enter the percent of tax to charge on all invoices. (Tip: You can use a decimal if needed; for example, you can enter 9.45 if the sales tax rate is 9.45%.)
6. (Optional) If you’d like to add a default note that will appear on all invoices, type the text in the Notes field.
7. If you made any changes, be sure to click the Save button.
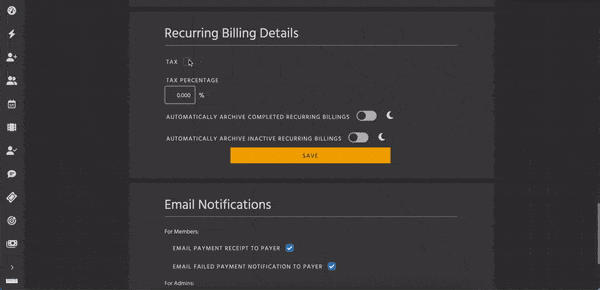
How to update Recurring Billing Details settings
The Recurring Billing Details settings enable you to select whether tax will apply by default to recurring billings. If your school is in an area where memberships or tuition is taxable, select the tax option and enter the tax percentage. Otherwise, you can leave it blank so recurring billings will not automatically add tax.
1. Click your username in the upper-right corner, click Settings, and then click the Finances tab. Alternatively, click the Finances icon in the left panel, and then click Settings (near the top right corner).
2. Scroll down to the Recurring Billing Details section.
3. Select the Tax check box if you need to charge taxes on recurring billings (for example, if memberships/tuition is taxable in your area). Selecting the Tax check box will automatically add the tax percentage when you create a new recurring billing.
4. If you selected the Tax check box, enter the percentage for the tax in the Tax Percentage field. If needed, you can use a decimal (for example, enter 9.45 if your tax rate is 9.45%).
5. (Optional) If you prefer to archive completed or inactive recurring billings, toggle on Automatically Archive Completed Recurring Billings and/or Automatically Archive Inactive Recurring Billings. (The moon icon indicates that this change will take place overnight.) If desired, update the number of months before the completed or inactive recurring billing will be automatically archived.
6. If you made changes, be sure to click the Save button.
How to update Email Notifications settings
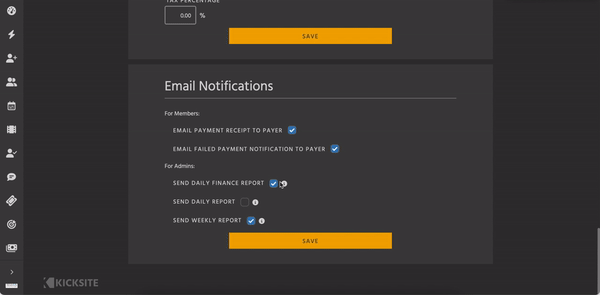
The Email Notifications settings determine if students or prospects automatically receive an email message with payment information; it also determines if and how often the administrator receives emailed reports.
Both options for student are selected by default; Kicksite recommends that you leave these options selected.
The Email Payment Receipt to Payer check box determines if the student or prospect receives an email with payment information after they pay an invoice.
The Email Failed Payment Notification to Payer check box determines if the student or prospect receives an email to let them know that a payment failed.
Under For Admins, you can choose to select or deselect the reports emailed to the admin’s email address. If you hover over the information icon, you can find out a little more about the report.
If you made any changes, click the Save button.