How to Add an Invoice
In the new Finances, you will need to create an invoice to process a payment. This ensures that you have clear records of all payments you receive for your school.
How to add an invoice
You can add an invoice from the student’s profile page or from the Finances page.
1. From the student’s profile: On the Finance module, click Add New+ and select Invoice. From the Finances page: Click Finances in the left panel. Make sure you’re on the Invoices tab and then click the Add New button. Start typing the student’s name in the Student/Family field, and select the correct student or family from the search results.
The rest of the steps are the same, whether you started from the student’s profile or from the Finances page.
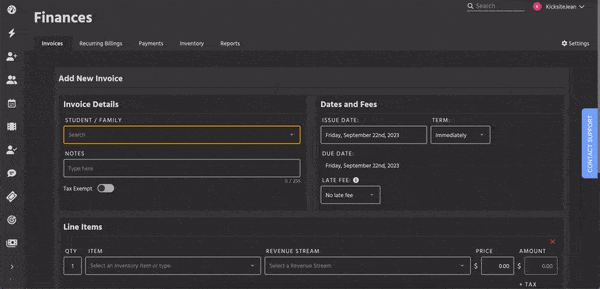
2. (Optional) You can add a note to the invoice by typing the information in the Notes field.
3. (Optional) If all items on the invoice are exempt from tax, toggle Tax Exempt on.
4. (Optional) You can change the date of the invoice by clicking Issue Date and selecting the correct date from the calendar picker. The Issue Date defaults to the current date.
5. (Optional) If you need to charge a late fee, select the desired option from the Late Fee drop-down list. If you selected Custom Fee, you can enter an amount in the Custom Late Fee field.
5. (Optional) Select when the invoice payment is due from the Term drop-down list. The default value is Immediately. The Due Date will update if you selected a different option. (The student has until the end of the day on the due date to pay the invoice; if the payment is not received, the invoice will be considered late.)
6. Click the down arrow on the Select an Inventory Item field to select the desired item from the inventory. If needed, you can change the quantity by typing in the Qty field. You can also type in the Select an Inventory Item field to add a custom item to the invoice.
7. (Optional) Click Add Additional Item+ to add a second inventory item. Repeat Step 5 to add the new item. Repeat Steps 5 and 6 as needed until you’ve added all the necessary items to the invoice.
If you charge sales tax, the sales tax amount is calculated and added to the invoice. You can review and update the sales tax amount on the Finances Settings page.
8. Click the Add button.
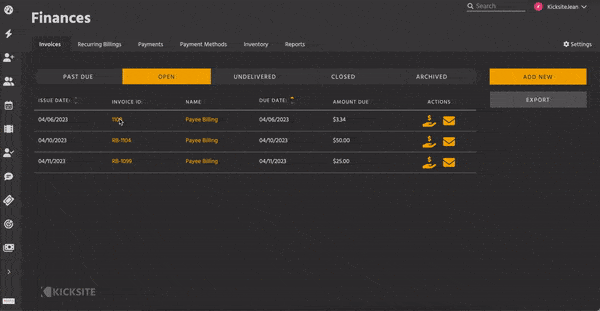
9. To immediately pay, click the View Now button in the green notification. (Alternatively, on the Finances page, click the Open tab and click the invoice ID for the invoice you just created.)
10. If the invoice contains physical items that the student receives at the time of payment, be sure to click Mark Delivered. This will deduct the quantity for the item in inventory.
11. Click the Pay button.
12. (Optional) If you need to take a partial payment, enter the amount to be paid in the Payment Amount field. (The default is to pay the full balance.)
13. Click the Choose Payment button.
14. Click the Payment Type drop-down list and select the desired type. If you chose Credit Card and the student has more than one Payment Method saved, select the correct card. (Note: If you do not process payments with Kicksite, you can choose a Payment Type, but you will not be able to add or select a Payment Method, or charge the invoice to a card or ACH.)
15. Click the Pay Now button.
The invoice status updates to Closed. (If the student made a partial payment, it will remain in Open status.)