The Calendar View
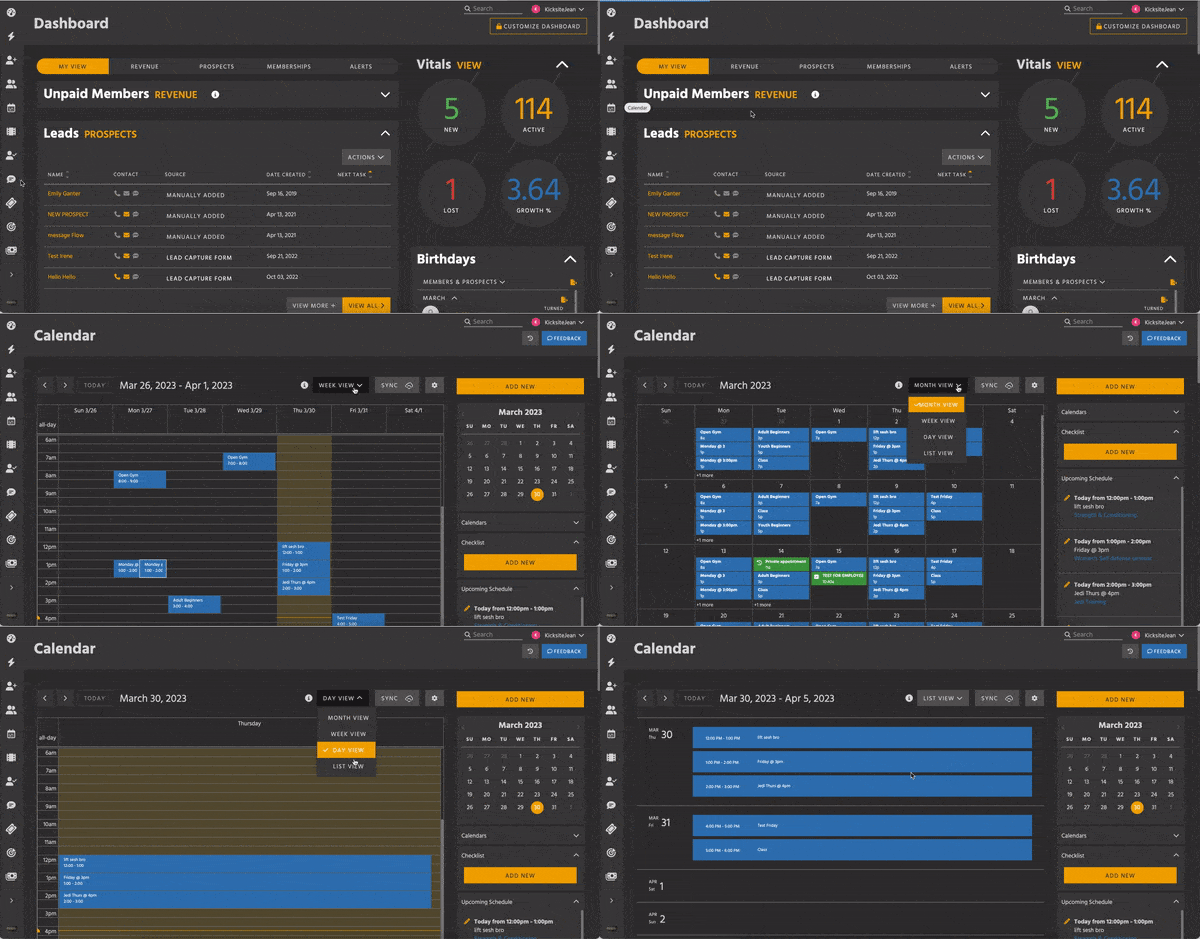
Appointments and tasks are an essential part of daily business. Kicksite has updated the Calendar view so that you can see your schedule at a glance. (If you’re in the classic view, on the Appointments page, click the New View button to go to the updated Calendar.)
You can see the weekly classes you added in Program Settings on the Calendar. You can also add a single class using the Calendar. Keep in mind that any class you add on the Calendar is NOT a weekly, recurring class, but a single class time. (To add a regularly scheduled, weekly class, you add it in Program Settings.)
What you see in the Calendar

Click the Calendar icon in the left panel to see the Calendar. You see the current week by default. You can change the view to see:
- Week View: The time frame shown appears in this drop-down list. You can select Month View to see a full month at a time; Week View is the default. Choose Day View to see only one day at a time (useful for days with lots of appointments, tasks, or classes scheduled).
- Sync: Click Sync if you would like to sync up your Kicksite appointments and tasks with your personal calendar. Keep in mind that this communication is one-way (from Kicksite to your calendar), so if you need to add or update an appointment or task, you need to do that in Kicksite.
On the right side, you see:
- Add New button: Click this button to set up a new appointment, task, or single class (see the next section for the step lists).
- Calendars: Click the down arrow and deselect check boxes to hide that item.
- Checklist: Click the down arrow to expand and see any checklist items. To add an item, click Add New and in the dialog box that appears, type the item in the List Item field. If you want to share the item with all employees, select the Public option (Private is selected by default). Click the Add New button. Click the circle to the left of the item to check it off; click the x to the right of the item to remove it.
- Upcoming Schedule: Shows a list of future appointments, tasks, and classes. You can scroll down to see all items.
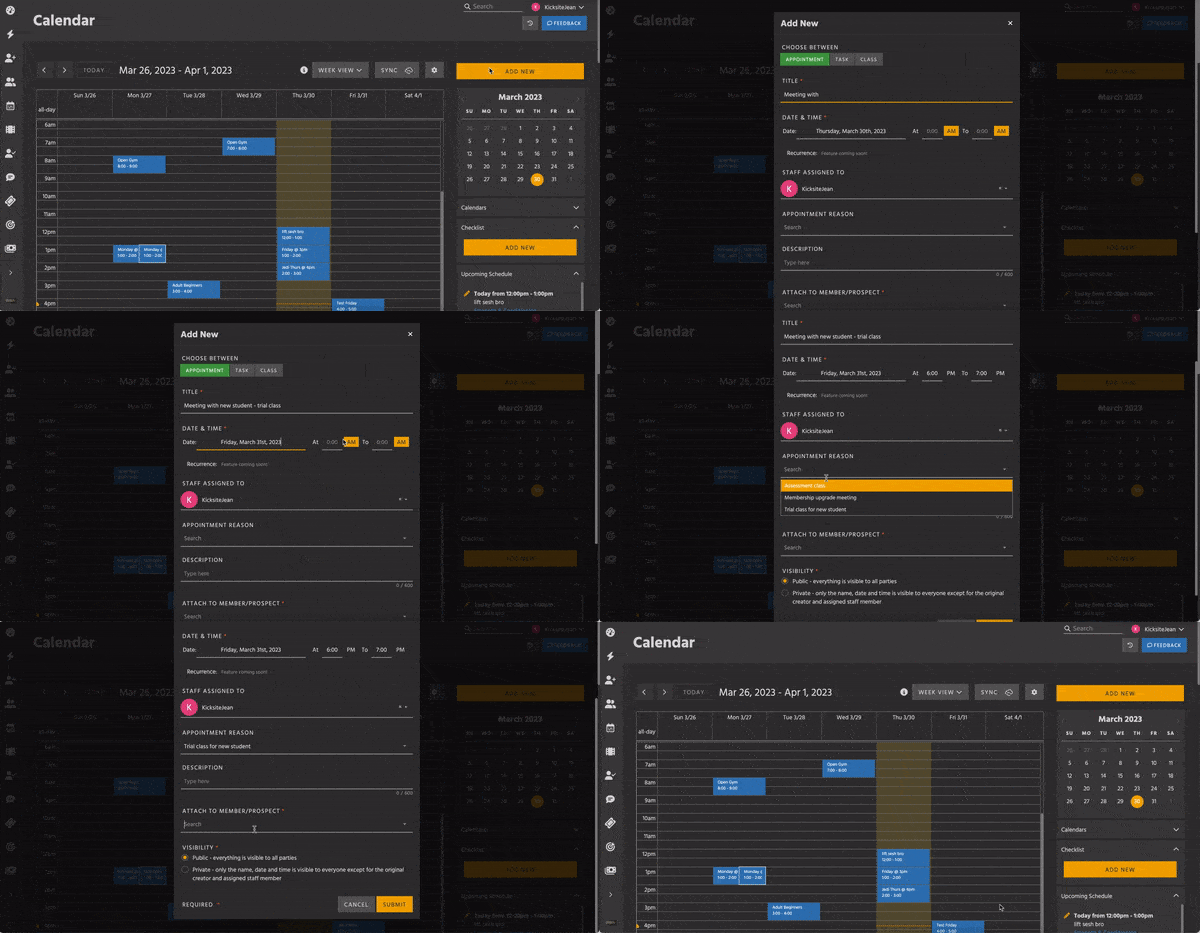
To add a new appointment or task
1. Click the Add New button.
2. Click Appointment or Task, depending on which you need to schedule.

3. In the Title field, type a name for the appointment or task.
4. Click the date, and in the calendar that pops up, click to select the desired day. If needed, you can click the right and left arrows to scroll to a different month. (For example, click the right arrow to schedule in the following month.) Type the starting and ending times; click the AM button to change to PM for afternoon/evening times.
5. If needed, click the down arrow under Staff Assigned To to change who is assigned to the task or appointment.
6. Click the down arrow to select an Appointment Reason or Task Category. (You can add or edit these on the Calendar Settings page.)
7. Under Description, type a few words or a sentence to describe the task or appointment. Keeping the Description brief but specific will be helpful to quickly see what the appointment or task is about.
8. If you selected Appointment, you must to add a student or prospect; start typing the student’s or prospect’s name in the text box under Attach to a Student / Prospect. As you type, matching names appear; click the correct name. (Adding a student or prospect is optional for a task.)
9. If you want to keep the task or appointment private, select the Private option. Public is selected by default, meaning that the admin and all employees can view the appointment or task after you add it.
10. Click the Submit button.
The new task or appointment appears on the Calendar.
The student or prospect will receive an email notification of the upcoming appointment. They will also receive a reminder email 24 hours prior to the scheduled appointment.
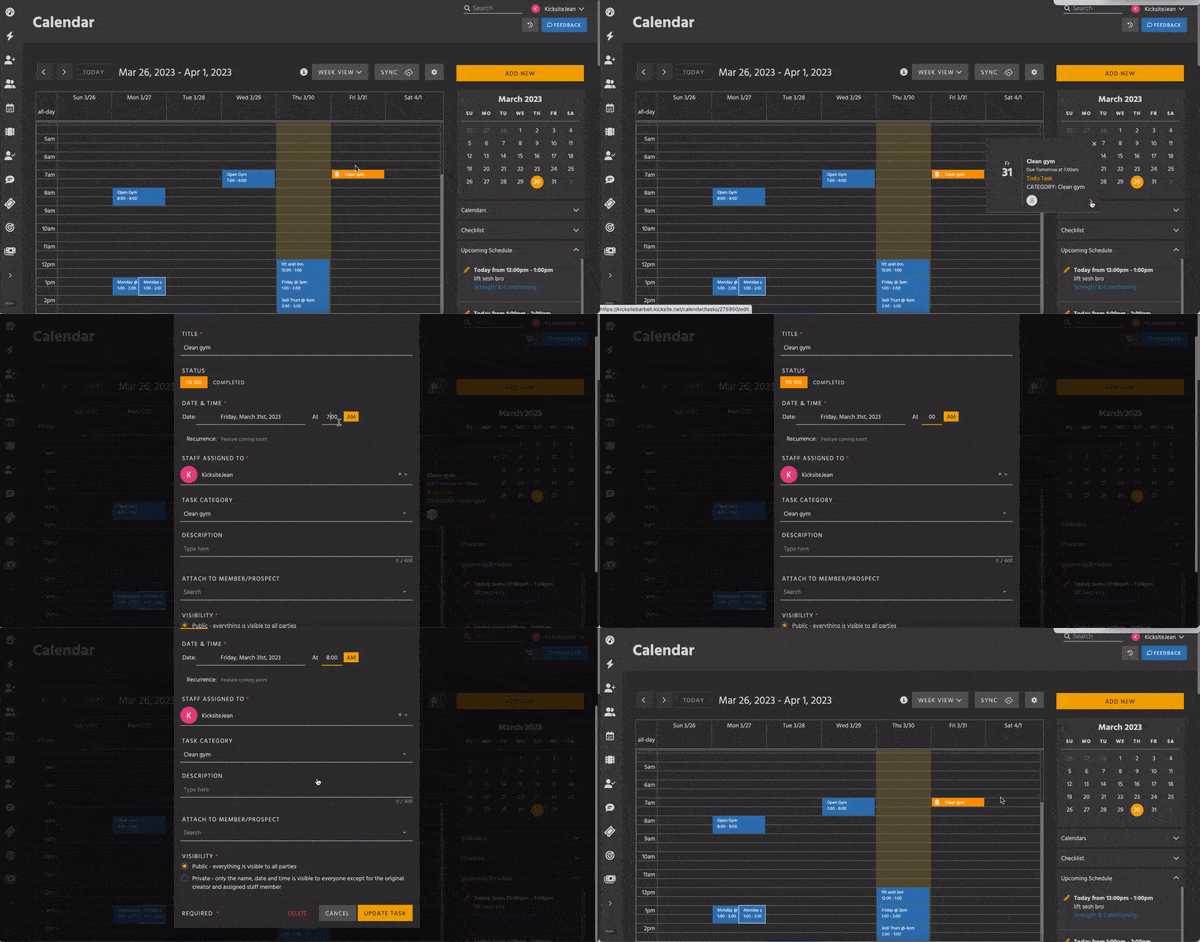
To change an existing appointment or task:
You can drag and drop an appointment or task from one day to another to update the item. This only changes the day of the appointment or task; all other options remain the same.
1. Click the desired appointment or task on the Calendar, and then click the right-pointing arrow on the right side of the pop-up to update the item.

2A. If you are updating an appointment, in the Update Appointment window, click one of the status indicators if needed:
- Scheduled: Indicates that the appointment is scheduled (the default status).
- Rescheduled: Click to indicate that this appointment was rescheduled from the original meeting time.
- Confirmed: Click to indicate that the student or prospect had confirmed the appointment.
- No Showed: Click to indicate that the student or prospect did not attend the appointment.
- Completed: Click to indicate that the student or prospect came to the appointment and it has been completed.
2B. If you are updating a task, in the Update Task window, click one of the status indicators if needed:
- To Do: Indicates that the task is a to-do item.
- Complete: Click to indicate that the task has been completed.
3. If needed, select a new date on the calendar.
4. If needed, select a new start and end time (for appointments) or time (for tasks).
5. If needed, select a new employee in the Assigned To drop-down list.
6. If needed, select a different option for the Appointment Reason or Task Category.
7. If needed, edit the text under Description.
8. If needed, select or deselect the Public check box.
9. Click Delete to delete the item; click Cancel if you do not want to save any changes; click Update Appointment or Update Task to save any changes.
The student or prospect, as well as the assigned employee, will receive an email notification with the updated appointment or task information.
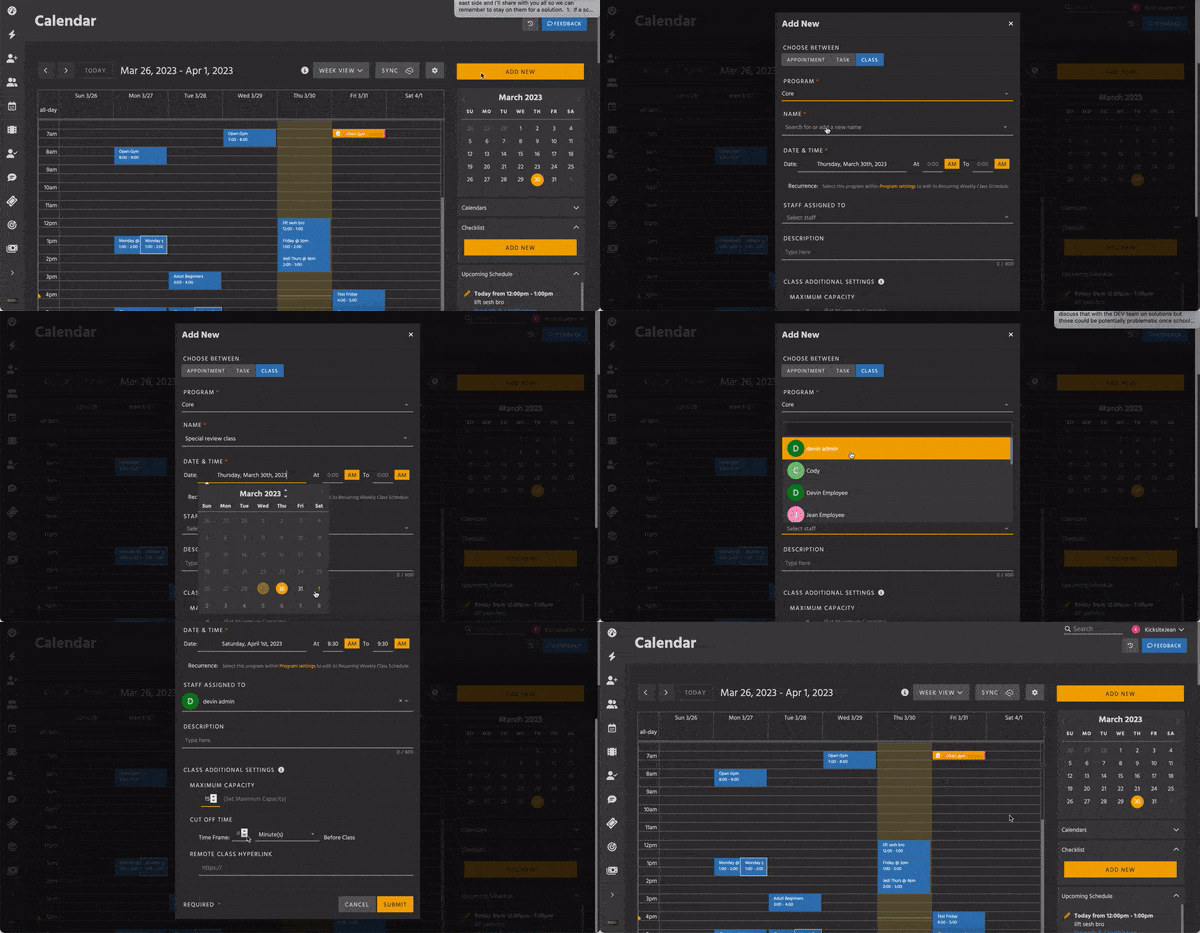
To add a new, single class:
If you need to add a single class, rather than a regular scheduled, weekly class, add it on the Calendar. Some examples of single classes you might want to add on the Calendar are a special class for testing prep, a seminar for referees, a class run by a guest instructor, or a private lesson. (Go to Program Settings to add a regularly scheduled, weekly class.)
1. On the Dashboard, click the View link beside Calendar. Alternatively, click Quick Links, click Calendar, and then click Calendar again.
2. Click the Add New button.
3. At the top of the Add New window, click Class.

4. From the Program drop-down list, select the desired program.
5. In the Name field, type a name for the class. Because this is a single class, and not a regularly scheduled class, you may want to add a little more information in the class name to indicate this is a special class.
6. Under Date & Time, select the date from the calendar picker. Type the starting and ending times. If needed, click AM beside the start and/or end times to change the time to PM.
7. (Optional) The following options are not required, but you may wish to use one or more:
- Select an employee from the Staff Assigned To drop-down list.
- Type a little more information about this class in the Description field.
- Under Maximum Capacity, enter the number of students for the class’s limit.
- Under Cut Off Time, enter the number of minutes before the class that students may register. For example, enter 30 to stop allowing students to register 30 minutes before the class starts.
- If the class is online, enter or copy and paste in the Zoom or other meeting link in the Remote Class Hyperlink field.
8. Click the Submit button to add the single class to the Calendar.